Mountains
Sunday, July 23, 2017
Friday, May 12, 2017
Genuine Buddy 125 Maintnance Notes: Part 6, Drivebelt Replacement and Roller to Slider Conversion
6: Genuine Buddy 125 Drive Belt and Rollers Replacement
One of the things that had distinguished our 2007 Buddy from the 2009 was ride quality and handling characteristics. The 2007 had spent a long time living outside in the elements, while the 2009 has been garage kept since day 0. The 2007 has always felt a little more rough. Part of this may be attributable to more mileage and being broken in and ridden hard, but part was obviously wear and tear in the drive line. The 2007 had been particularly known for surging transmission behavior. Sometimes it would accelerate hard, at other points it would hunt a bit at fixed throttle positions, or hesitate to down shift while slowing down (nearly stalling the engine at one point). This behavior was relatively subdued and was never severe enough to warrant diagnosis.
At the outset, I had inspected and found the drive belt to be worn to the limit (19mm if I remember correctly), and thus ordered another, which I then set out to install.
The Buddy's drive line cover is held in by a large number of small bolts, and while there is a gasket, oxidation and the post for the kick starter keep it snugly attached. I gently tap it on the side with a mallet to wiggle it free. The cover also contains the half moon gear and fast drive for the kick starter. You can also see an air vent at the back of the cover (left of this photo, front of bike is at the right). The case is actively vented by a fan impeller cast onto the variator drive face. The kick start teeth (right of the photo) engage a splined washer on the front of the variator drive face.
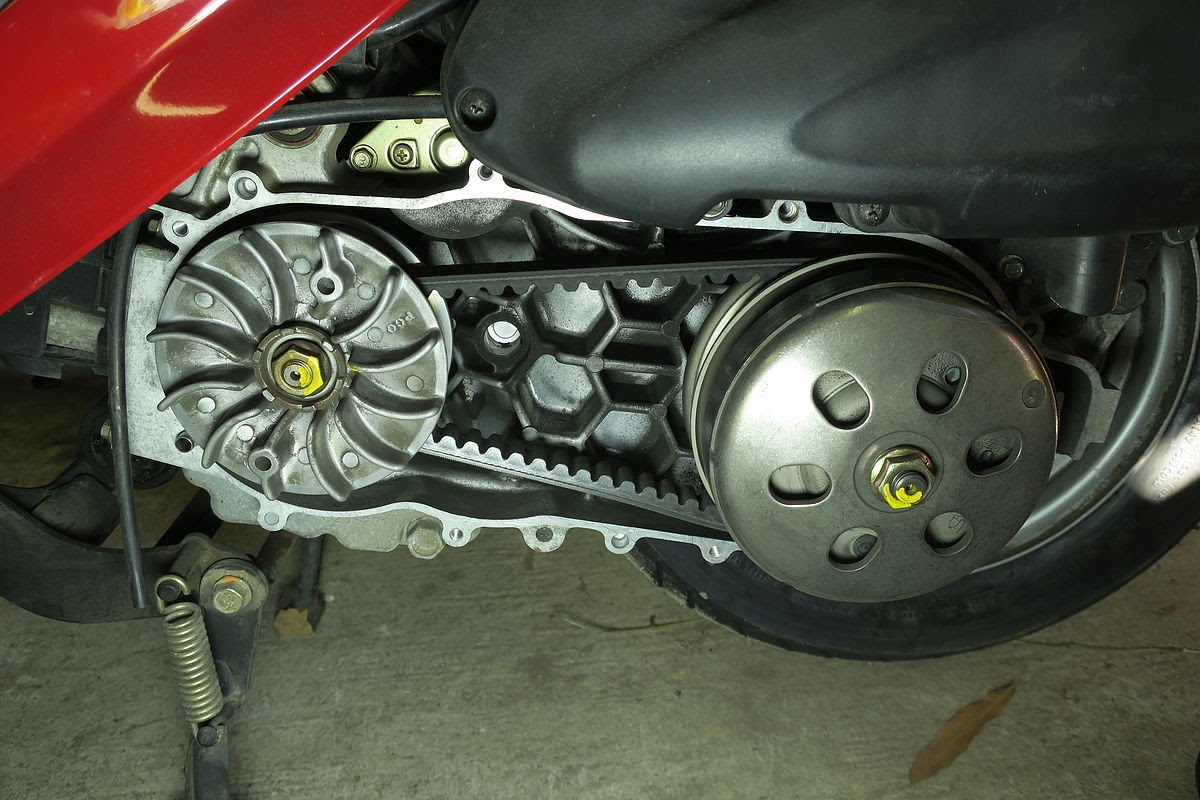
View of the inside of the drive line. The variator drive face is at left (also front of scooter) the clutch bell is at right. The variator and the clutch are on splined shafts (output shaft of engine and driveshaft of rear axle, respectively), and the speed control components (the variator moving face, the belt, the rear pulley with contra spring, and clutch) freewheel behind the splines. The manual says the the nuts on holding the clutch and variator on are at about 35 ft-lbs. They came right off using an impact wrench. Note that the kick starter engagement washer is splined as well, and it will need to be properly aligned in order to put the variator back on!
Variator drive face removed. The limits of the belt engagement are visible.
The variator moving face.
Buddy 125 clutch bell.
While dusty, the clutch surface was neither grooved nor glazed. I left it alone.
Drive belt nearly free. You can see the centrifugal clutch components at right.
Detail of belt and variator. The belt is wide enough that the variator plates never touch.
Clutch made in 2007. Clutch pads look acceptable.
Clutch pads up close.
Backside of clutch assembly. There's a roller bearings in there!
Detail of the clutch roller bearings. They ride in a carrier. When I first saw them, I worried the carrier was damaged as the central groove was so full of grease and grit that it looked like it had maybe been warn through, but some cleaning revealed that it was intentional. Perhaps a lub reservoir? I added a dab of grease to it.
Backside of the variator. The rollers press against the plate to push the variator halves apart at high RPM. The white platic bits are gliders. Dusty! I wonder what the blue paint marks are there for?
At this point, I set the variator aside to look at the belt I had just removed (remember the belt?). New belt looked pretty similar.
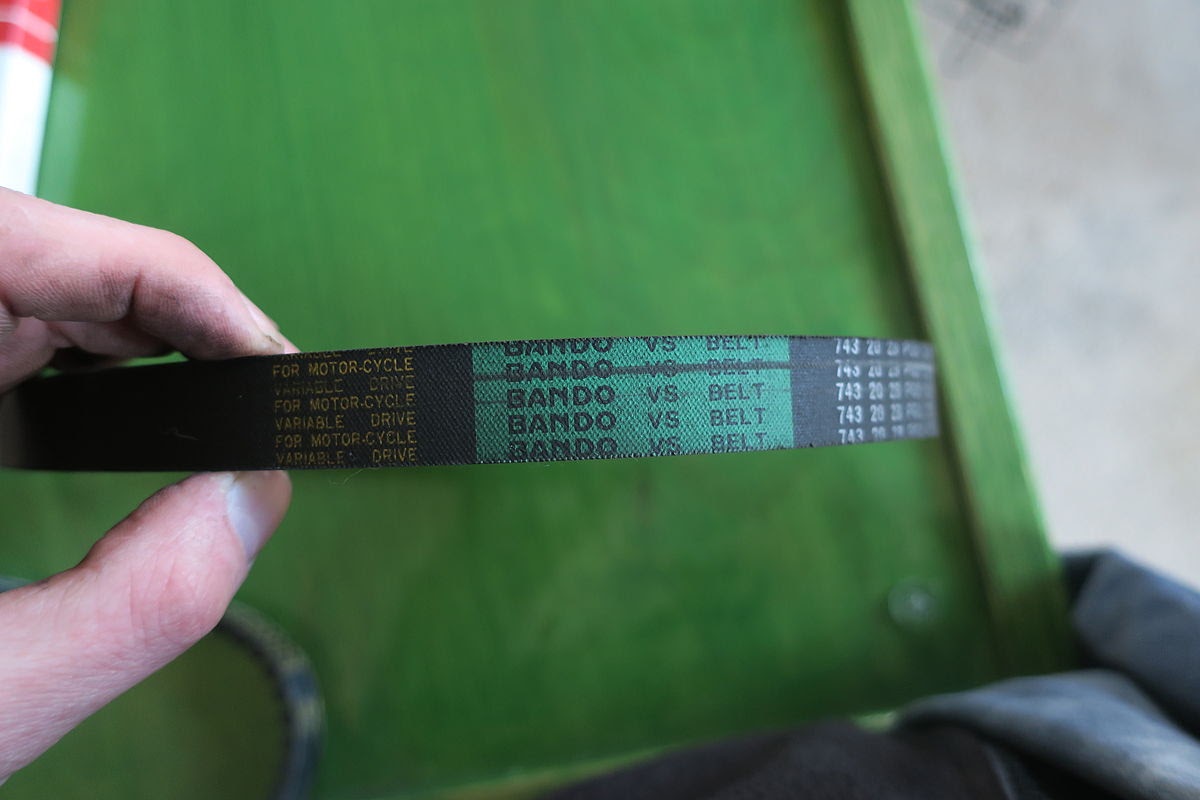
Old belt: Bando Nylon 743x20x28
New belt: Gates Powerlink Kevlar 743x20x30 PL30707. I read these don't last as long, but I didn't know that when I bought it.
Back to the variator. I pulled the cover and looked at the rollers. Wow! Dusty!
All of the rollers (at 6000 miles) were just barely out-of-round.
A worn spot
Another worn spot.
Rollers in their races.
I ordered some replacement Dr. Pulley Sliders. The Buddy 125 comes with 18x14mm 11.5 gram rollers stock. I decided to try heavier sliders (12 g) to see if I could get some more top speed.
Sliders installed in their races.
Putting the drive line back together was a lot easier when I found I could push the clutch pulley open with my hands and wedge the drive belt in to keep it open, creating a little slack on the variator pulley to make it easy to align the kick starter splines and the variator drive face with the engine output shaft spines. I used a strap wrench and a torque wrench to get the nuts back to 35 foot-lbs.
The sliders immediately improved the quality of the power delivery, and the engine and drive line. The heavier sliders definitely reduced acceleration off the line, and though the scooter has better acceleration in the 35-50 mph range, it doesn't seem to want to go faster overall and hill climbing is also a bit worse. For this bike at least, 12 g sliders are too heavy and suboptimal and I'm likely to go with something lighter in the end, though for a rider that prefers more demure handling, the 12g might be an improvement.... the front wheel won't ever leave the ground with them installed.
One of the things that had distinguished our 2007 Buddy from the 2009 was ride quality and handling characteristics. The 2007 had spent a long time living outside in the elements, while the 2009 has been garage kept since day 0. The 2007 has always felt a little more rough. Part of this may be attributable to more mileage and being broken in and ridden hard, but part was obviously wear and tear in the drive line. The 2007 had been particularly known for surging transmission behavior. Sometimes it would accelerate hard, at other points it would hunt a bit at fixed throttle positions, or hesitate to down shift while slowing down (nearly stalling the engine at one point). This behavior was relatively subdued and was never severe enough to warrant diagnosis.
At the outset, I had inspected and found the drive belt to be worn to the limit (19mm if I remember correctly), and thus ordered another, which I then set out to install.
The Buddy's drive line cover is held in by a large number of small bolts, and while there is a gasket, oxidation and the post for the kick starter keep it snugly attached. I gently tap it on the side with a mallet to wiggle it free. The cover also contains the half moon gear and fast drive for the kick starter. You can also see an air vent at the back of the cover (left of this photo, front of bike is at the right). The case is actively vented by a fan impeller cast onto the variator drive face. The kick start teeth (right of the photo) engage a splined washer on the front of the variator drive face.
View of the inside of the drive line. The variator drive face is at left (also front of scooter) the clutch bell is at right. The variator and the clutch are on splined shafts (output shaft of engine and driveshaft of rear axle, respectively), and the speed control components (the variator moving face, the belt, the rear pulley with contra spring, and clutch) freewheel behind the splines. The manual says the the nuts on holding the clutch and variator on are at about 35 ft-lbs. They came right off using an impact wrench. Note that the kick starter engagement washer is splined as well, and it will need to be properly aligned in order to put the variator back on!
Variator drive face removed. The limits of the belt engagement are visible.
The variator moving face.
Buddy 125 clutch bell.
While dusty, the clutch surface was neither grooved nor glazed. I left it alone.
Drive belt nearly free. You can see the centrifugal clutch components at right.
Detail of belt and variator. The belt is wide enough that the variator plates never touch.
Clutch made in 2007. Clutch pads look acceptable.
Clutch pads up close.
Backside of clutch assembly. There's a roller bearings in there!
Detail of the clutch roller bearings. They ride in a carrier. When I first saw them, I worried the carrier was damaged as the central groove was so full of grease and grit that it looked like it had maybe been warn through, but some cleaning revealed that it was intentional. Perhaps a lub reservoir? I added a dab of grease to it.
Backside of the variator. The rollers press against the plate to push the variator halves apart at high RPM. The white platic bits are gliders. Dusty! I wonder what the blue paint marks are there for?
At this point, I set the variator aside to look at the belt I had just removed (remember the belt?). New belt looked pretty similar.
Old belt: Bando Nylon 743x20x28
New belt: Gates Powerlink Kevlar 743x20x30 PL30707. I read these don't last as long, but I didn't know that when I bought it.
Back to the variator. I pulled the cover and looked at the rollers. Wow! Dusty!
All of the rollers (at 6000 miles) were just barely out-of-round.
A worn spot
Another worn spot.
Rollers in their races.
I ordered some replacement Dr. Pulley Sliders. The Buddy 125 comes with 18x14mm 11.5 gram rollers stock. I decided to try heavier sliders (12 g) to see if I could get some more top speed.
Sliders installed in their races.
Putting the drive line back together was a lot easier when I found I could push the clutch pulley open with my hands and wedge the drive belt in to keep it open, creating a little slack on the variator pulley to make it easy to align the kick starter splines and the variator drive face with the engine output shaft spines. I used a strap wrench and a torque wrench to get the nuts back to 35 foot-lbs.
The sliders immediately improved the quality of the power delivery, and the engine and drive line. The heavier sliders definitely reduced acceleration off the line, and though the scooter has better acceleration in the 35-50 mph range, it doesn't seem to want to go faster overall and hill climbing is also a bit worse. For this bike at least, 12 g sliders are too heavy and suboptimal and I'm likely to go with something lighter in the end, though for a rider that prefers more demure handling, the 12g might be an improvement.... the front wheel won't ever leave the ground with them installed.
Genuine Buddy 125 Maintnance Notes: Part 5, Deadlight/Running Light Mod
5: Genuine Buddy 125 LED Running Light Installation
The Genuine Buddys have turn signals installed under the handlebars at a distance that complies with DOT regulations. In most other countries, the turn signals on a motorcycle can be much closer together, and the Buddy has unused light bulb sockets on the front leg shield above the front fork. These are often called Deadlights in discussions. One does not have to own the scooter long to wonder why such a large part of the vehicles design would go unused.
In states where running and marker lights are legal on motorcycles, these can be modified to work with LED lights that don't overtax the Buddy's milquetoast electrical system. In 2013, I ordered a set of running light adapters from Voodoo Scooter Parts, one of which I installed in the Girly's scooter right away with a 1156-WW45-T bulbs from SuperBrightLEDS, and the other set sat on the shelf and collected cobwebs. While I was impressed with the visibility of the running lights, the cost of the LED bulbs was high enough to discourage repeating the job on the other scooter.
A few years later, bright, less expensive (sometimes even available on sale) 1156-WW27-T bulbs had become available, so I bought another set.
Getting the blubs installed requires a phillips head screwdriver (two, a large one for the leg shield front panel, and a smaller one for the light lenses. There's one big screw holding the leg shield panel on up front, and two small screws that reach through from the drivers position.
Here's a picture of the panel open. The holes for the smaller screws just above and to the left and right of the horn. There are also two electrical connectors taped to the side of the fairing, coming from the deadlight bulb sockets. The VSP adapters plug in there.
The running lights have to be installed from the front, there's no socket in the back of the reflector to remove like most automotive lights. There's been some fear of cracking/breaking the deadlight lens. Although the lens is also screwed in, there is a tab and some pressure holding it in the leg shield. Following forum advice, I let the lenses warm up before I remove them to make the plastic a bit more flexible, and pry gently from the top near the screw. When I install LED blubs (ok, any automotive bulb, but especially bulbs that are not likely to be removed again), I put a dab of dielectric grease on the contacts to stave off erosion and the off chance of a short circuit from water ingress.
Deadlight before:
Deadlight with LED bulb installed.
LED installed behind the deadlight cover.
This is the VSP running light adapter. There's one for each bulb. Inside the tubing is a voltage regulator/spike suppressor.
Deadlight connectors down are taped to the to leg shield with black tape. Genuine hides a lot behind the leg shield.
Deadlight adapters attached...
Deadlight adapter attached to power leads. Black wire grounds near the blinker announcer, the red (+) wire goes to a tap on the ignition wire at the switch. Deadlight adapters get ziptied to the big hole on the bottom of the leg shield.
New 1156-WW27-T (Red, left) vs older 1156-WW45-T (Seafoam, right). The newer bulbs are somewhat brighter, but not suddenly blinding. They are also warmer/less white.
While subtle, the differences in light color does end up matching the headlight colors of the two scooters quite accurately. We installed a PIAA Ultrastar bulb in the Seafoam buddy, and it's output is whiter than the stock bulb. However, we did not find it to be meaningfully brighter, and won't be repeating the upgrade/hassle of taking apart the headset.
The Genuine Buddys have turn signals installed under the handlebars at a distance that complies with DOT regulations. In most other countries, the turn signals on a motorcycle can be much closer together, and the Buddy has unused light bulb sockets on the front leg shield above the front fork. These are often called Deadlights in discussions. One does not have to own the scooter long to wonder why such a large part of the vehicles design would go unused.
In states where running and marker lights are legal on motorcycles, these can be modified to work with LED lights that don't overtax the Buddy's milquetoast electrical system. In 2013, I ordered a set of running light adapters from Voodoo Scooter Parts, one of which I installed in the Girly's scooter right away with a 1156-WW45-T bulbs from SuperBrightLEDS, and the other set sat on the shelf and collected cobwebs. While I was impressed with the visibility of the running lights, the cost of the LED bulbs was high enough to discourage repeating the job on the other scooter.
A few years later, bright, less expensive (sometimes even available on sale) 1156-WW27-T bulbs had become available, so I bought another set.
Getting the blubs installed requires a phillips head screwdriver (two, a large one for the leg shield front panel, and a smaller one for the light lenses. There's one big screw holding the leg shield panel on up front, and two small screws that reach through from the drivers position.
Here's a picture of the panel open. The holes for the smaller screws just above and to the left and right of the horn. There are also two electrical connectors taped to the side of the fairing, coming from the deadlight bulb sockets. The VSP adapters plug in there.
The running lights have to be installed from the front, there's no socket in the back of the reflector to remove like most automotive lights. There's been some fear of cracking/breaking the deadlight lens. Although the lens is also screwed in, there is a tab and some pressure holding it in the leg shield. Following forum advice, I let the lenses warm up before I remove them to make the plastic a bit more flexible, and pry gently from the top near the screw. When I install LED blubs (ok, any automotive bulb, but especially bulbs that are not likely to be removed again), I put a dab of dielectric grease on the contacts to stave off erosion and the off chance of a short circuit from water ingress.
Deadlight before:
Deadlight with LED bulb installed.
LED installed behind the deadlight cover.
This is the VSP running light adapter. There's one for each bulb. Inside the tubing is a voltage regulator/spike suppressor.
Deadlight connectors down are taped to the to leg shield with black tape. Genuine hides a lot behind the leg shield.
Deadlight adapters attached...
Deadlight adapter attached to power leads. Black wire grounds near the blinker announcer, the red (+) wire goes to a tap on the ignition wire at the switch. Deadlight adapters get ziptied to the big hole on the bottom of the leg shield.
New 1156-WW27-T (Red, left) vs older 1156-WW45-T (Seafoam, right). The newer bulbs are somewhat brighter, but not suddenly blinding. They are also warmer/less white.
While subtle, the differences in light color does end up matching the headlight colors of the two scooters quite accurately. We installed a PIAA Ultrastar bulb in the Seafoam buddy, and it's output is whiter than the stock bulb. However, we did not find it to be meaningfully brighter, and won't be repeating the upgrade/hassle of taking apart the headset.
Subscribe to:
Posts (Atom)