Mountains

Mountains
Showing posts with label ChevOldsmoBuiac. Show all posts

Saturday, January 10, 2026

NF Sonata Rusted Muffler and Exhaust Notes

Our 2010 NF Sonata (well over 200K miles now) failed safety inspection when the inspector finally found the busted pinch seam in the muffler that I had been willfully ignoring for several years. The shop helpfully quoted around $1100 to replace the exhaust system, including the second catalytic converter. They justified this by pointing out the system had really rusty flanges and they weren't going to be able to get things apart neatly. It would also take over a week to get the parts together.

Reviewing the quote, and to my surprise, they were only asking for a small amount of money for labor. Additionally, the parts were aftermarket!

I am morally opposed to replacing catalytic converters that are not completely destroyed. They are expensive parts and there is a small chance car goes to a state with weird emissions rules that doesn't accept working parts that aren't certified. So I declined the service and took the car home, pink badge of shame proudly in the window, and resolved to fix it myself and use my welding skills to make up any gaps originating from rusty flanges and reuse as much of the old system as possible.

Without doing due research I ordered a muffler and resonator kit (Walker SS) from rockauto for far less than the shop quote. When these parts arrived, it was clear that they have a lot more galvanized steel than the OE parts. It seems like just the body of the muffler is stainless while the resonator and pipe is galvanized steel. I instantly regretted my purchase and actually spent time to see what other options existed between the basic kit and the expensive Hyundai original muffler.

Further study showed that API makes a muffler (API 29927-07553709) that looks identical to the OE muffler (Hyundai 287003K520), but for a fraction of the price. Also, given the shipping time, had I realized that the Walker kit had so much galvanized I would have made a junkyard run to see if I could get used unit. Most cars made since 1999 or so have much better exhaust systems than old cars, so I would bet that a junker that hadn't spent much of it's life swimming in salt would have a nearly pristine muffler.

When I started the replacement, my goal was to use as much of the old system as possible. The Walker unit has a flared joint where the unit attaches to the centerline exhaust mid pipe, so I cut the old unit there. Unfortunately the flare was just narrow enough that it wouldn't fit on the OE system. 

It was disappointing to find the Walker SS muffler was considerably lighter than the OE unit once I had it cut free of the car. Less metal, less stainless, so I surmise, shorter life.

I hopefully tried to disconnect the rusty flange at the resonator so I could just bolt in the new midpipe at the flange. While they were quite rusty, once I started attacking them it was also apparent that there was quite a bit of metal left and they were at no risk of failure. After a couple of hours of struggle, I gave up and cut the midpipe and resonator flanges too (it seem like the bolts in the flanges were pressed in as studs) and resolved use 2 1/8" couplers I had on hand or weld it together. The couplers worked! But sadly, now the car has lots of galvanized steel in its exhaust.

Astute readers may recall that I was replacing mufflers an pipes in a 1990 Oldsmobile every 5 years or so.  

IF I were to replace this system again (big IF, I doubt it has 4 years of road life left given mileage and rust elsewhere). I would approach this very differently. 

Take aways: 

First: Look for a junkyard muffler, API or other muffler that has the ribbed stamped body. .

Second: having a collection of 2 1/8", 2 1/4", ID/OD couplers on hand would make it easier to replace just the muffler and not a lot of pipe. Especially if these were stainless.

Third: An exhaust pipe expander would have let me expand the flare on the new muffler, and saved hours of work.  The NF 2.4L sonata seems like it's 2 1/8" OD pipe, but there's a lot of complex bends...


Monday, July 5, 2021

I bought a new shitbox: Here's everything that was wrong with my Volvo C30 when I bought it

 I know, I know, the used car market is crap because of the pandemic, but someone in my family got munched up pretty good in a car accident where they didn't have the benefit of airbags, and started second guessing my life choices, I when I spied a car that was on my A list and in my price range on Craigslist, of course I shot the seller a bajillion questions. The seller claimed that they had bought the C30 for their kid to drive in high school and college, and that the maintenance had been neglected to some degree.


1: Good news: Oil was full. Bad news: No memory of last oil change. Estimated cost: $60: 7 quarts (really 10, since 5 quart jugs) 0W-40 and a new filter. Takes about an hour.

2: TPMS system: Some of the TPMS senders. $200 per wheel. Probably $400 total. I'll have to pay the shop for this.

3: Halfshafts: Bad boots. $200 and 3-4 hours.

4: Leaking Sunroof drains. $10 and an hour futzing.

5: Passenger Tail Lights and driver parking lights won't stay on. At least, not reliably. Cost: Countless hours of frustration, worst case, new wiring and Body Computer Module (thousands!). However, i think its related to the mixture of burnt out bulbs and bad aftermarket LEDs in the car.

6: Idle vibration: Probably bad engine and torque mounts. Expensive! 3 parts, about $300.

7: Mystery aftermarket wheels: 17x7.5 rims and 6 point spline key: zero cost upfront but 225 width tires are going to add a bit.

8: Old air filter: $14

9: Old cabin air filter: $10 and a ton of swearing, had to remove the gas pedal to do this. not easy at all.

10: Bad windshield wipers $43. This car's wipers are not cheap!

11: Belly pan gone $85 for a durable plastic unit or $185 for aluminum plate.

12: Belts and tensioners look original. Car is 10 years/150k miles. $100 for tensioners and $30 for belts. The tensioners still spin okay, but I'll do them with the halfshafts. 1 hour.

13: Battery box missing pieces $15. Probably 30 minutes to remove the battery and get it right.

14: Possibly related to #5: trailer hitch wiring bodged in and just laying in rear compartment. Cost: an hour of futzing to hide the wires and test that it wasn't related to #5.

15: License plate light has internal short: Fixed by bending metal innards: took 1/2 hour to pull bumper apart

16: Front parking light bulbs burnt out $16 for a couple of packs of bulbs (W5W clear and amber)

17: Driver side fog light burnt out ($18 H8 bulb). Takes 10 minutes to pop the old bulb out.

18: Shifter blind heavily mutilated: manual shift works, but you can see into the console. $17. 20 minutes to swap.

19: Handbrake handle trim missing. Expensive! $15 for a tiny piece of plastic that clips on. 10 seconds to clip on.

20: Cup holder: Rubber fingers are shot. Cheap! $18. 10 seconds to swap the old one. I'll try cutting new rubber sheet to fit the old unit, as it pops apart.

21: Passenger Side Seatbelt clasp: the C30 seats slide forward to let rear passengers out, this lets the seatbelt follow the seat in the default case where there aren't riders. Again, $15 for a tiny piece of plastic.

22: Trailer hitch chain loop is bent. Fixed by bending it back with a big freaking wrench. 5 minutes.

23: Busted oil filter cap. $25, 60 minutes to install, and a lot of swearing because it's going to make a big mess to let a quart of oil out of the engine.

Repair expenses are something I expect from used cars. I'm a bit surprised by the extent of stuff that's been let go in this case. On the upside, it's pretty easy to remove parts: nothing is rusted together yet!


Tuesday, May 1, 2018

Oldsmobile Cutlass Cierra/GM 2.5L I4 TBI - Won't Start Hot Troubleshooting 2: DIS and Crank Sensor

My 1990 Olds Cutlass Ciera with a GM TBI 2.5 L I4 Iron Duke would periodically not restart after it had run for a while and was hot. The situation reached peak hilarity when it failed in my carpooling coworkers driveway on a cold morning.

The initial attempt at troubleshooting focused on the TBI unit and fuel system. The next likely point of failure was the coils/DIS (Digital Ignition System [module]), and crank sensor. On the GM 700 Series TBI system, these components are directly connected together into a single unit.

There's a decent write up on the system on the Megasquirt Page. Between that page and the Haynes manual, I've been able to construct a diagram that looks about right, but I haven't really tried to track down every single pin on the DIS (I think there's a separate tachometer output, and I neglected fuses, coils, and the fuel pump circuit.


While I am still a bit unclear on the specifics of the operation, the inductive pickup crankshaft sensor is directly connected to the DIS, which then sends pulses to the ECU (Purple/White Wire). The ECU then uses a lookup table determine when to fire the spark plugs and sends a pulse back to the DIS to trigger a spark (White Wire). The system is a 2 coil, waste spark system, so each cylinder ends up sparking twice per cycle.

The ECU also uses the pulses from the crank sensor to time the fuel injector by grounding the injector (Dk. Blue wire). No injector pulses mean no fuel, which would lead to the condition observed that the car didn't smell very gassy when it wasn't starting, and it wasn't stumbling or coughing. This could be caused by the DIS not getting a signal from the crank sensor, or by the DIS going on the fritz and not sending a signal, or by a wiring failure.

Also of note, during startup, the DIS completely controls spark, and the ECU grounds EST bypass. Once the engine is running, the ECU sets ECU bypass to +5V, and sends an EST signal.


Checking the coil/DIS/crank module is not an easy task on this car. GM thought it was so reliable (ok, lets face it, 28 years is a good haul) that it put it in between the engine and the fire wall, above the rack and frame member, and below the TBI and intake manifold, and then obscured every access route with cables and tubing. It's a good job for someone with a good spacial sense and skinny arms.

To check the ignition module, a lot of stuff has to come off the top of the engine.

I bought a fuel line disconnect tool kit from amazon. Annoyingly, it turns out there really aren't that many different types of fuel lines, the kit comes with essentially 4-5 different versions of the same tool. For this engine, only 3/8 and 5/16 tools are needed.


I left a rag to soak up the fuel that dribbled out of the fuel lines.

Air filter off, and throttle cable and crank held out of the way with a bungie cord.


There are 4 nut holding the DIS on to the this alumnium tray, with captive bolts. The tray isn't very thick, so the bolts will start spinning as the nuts are loosened, There are 3 bolts holding the whole assembly to the block. The small two pin connector on the bottom of the tray is from the crank position sensor.

After removing the 3 big bolts, I tried to pull the sensor out in one piece. Instead, it handily snapped in two. Drat.

After many hours of fiddling with different tools, I was able to drill the back of the inductive pickup with small cordless drill and insert a screw, which allowed me to pull the crank sensor out of the block. I nearly gave up and dropped the oil pan to push the sensor out from the inside. The sensor body was heavily cracked and it's magnetic character had accumulated a fine coating of metal shavings.

Cleaned up, the cracks are a lot more apparent. This looks like the point of failure!

The inductive pickup end. Very magnetic still.

I then went about reassembling the DIS system with new parts. I bought a Standard Motor Products LX344 DIS and PC3 crank sensor. The sales literature claims the LX344 is an improvement over the Delphi/GM module, though I can't quite imagine how it could improve.

The crank position sensor bolted to the aluminum heat spreader. The socket gets a thick bead of PTFE grease.

Comparison of the Delphi (top) and Standard Motor Products DIS. Outwardly, they're almost identical. I assume the Delphi didn't come from he factory with spider parts.

The LX344 came with an extremely useful troubleshooting guide! The guide explained that the DIS I was about to replace was probably not faulty, and that the ECU, the coil pack, and the crank sensor were likely culprits! To check the ECU, it suggested monitoring the RPM line from the DIS and the EST return for pulses. To check the coils, it suggest checking for spark by direct test or switching the coils around. It suggests checking the crank sensor resistance and for damage to it's housing. I guess that's what I found.

I decided to not replace the original GM coil packs, although when I was ordering the DIS and sensor, they were tempting given the effort involved. They looked ok and ignition hasn't been an issue.


The reassembled DIS/coil module. DON'T DO THIS! It won't fit into the car unless you take the crank sensor off first. The crank sensor has to be attached once the unit is under the intake manifold.

Here's what the DIS/crank sensor hole looks like through the top of the intake. Basically one stands on hands and knees over the engine and reaches down with the right hand to wrench. Fortunately, the space under the intake is quite voluminous, and it's possible to fit a work light and other things and there's room.

Closeup of the crank sensor hole. I put a thick gob of grease there, in the hopes if someone ever has to pull the sensor again, it will just slide out.

I took the chance to re-route the spark plug cables as GM intended.

After the replacement, which took all weekend thanks to the broken crank sensor, the car started right up and has not failed since.

Monday, April 30, 2018

Oldsmobile Cutlass Cierra/GM 2.5L I4 TBI - Won't Start Hot Troubleshooting 1: TBI Check

Where upon I found myself in the parking lot of the coffee shop after a workout, coffee pinched twix my knees, pastry in my left hand, and ignition key in position III (Start Engine) in my right, and only two of three good things were happening.

The coffee shop was a short stop after a moderately long drive and the engine was good and warm, and turning it off gave it a good heat soak. After a 10 minute delay, it would crank with alacrity, but would not start, not even a cough.

After some poking around (testing for mechanical soundness, then the Fuel/Air/Spark trifecta), I determined that the injector wasn't pulsing fuel into the intake, either during priming, nor when cranking. While I was poking around with the hood open, trying to wiggle electrical connectors and divine an obvious point of failure, the engine started (after about 30 minutes of hood-open cooling).

Back at the hanger, I checked the (slightly useful) Haynes manual, asked google, and searched the Fiero, S-10, and a-body.net forums. Sadly, a few folks had the exact same symptoms I was experiencing but no one had posted a sure solution.

Examples:
A few successful trouble shooting posts found bad fuel pumps, fuel pump fuses and relays, and some discussion of failed injectors and fuel pressure regulators.

The fuel delivery system in the TBI Iron Duke has a few parts that have to work together.
  • Tank Fuel Pump (I could hear it turn on -it worked)
  • Fuel Pump Relay and Fuse (If the pump works, they work, obviously)
  • Oil Pressure Sensor/Switch (keeps the pump running when the engine is running, gathered it works since the engine runs fine, it was starting.)
  • Fuel Injector (unknown - no squirting when cranking)
  • Ignition Module (unknown - no ignition when cranking)
  • Crank Sensor (unknown - no ignition when cranking)
  • Engine Temperature Sensors (Couldn't test in the parking lot, but easy to test in the driveway, about 1000 ohms at 45C: about as warm as you can keep your hand on without feeling burning.)
  • Throttle Position Sensor (unknown)
  • ECU (Unknown, but hot start failure would not seem to indicate and ECU issue that would not manifest elsewhere).
The most likely candidates for inspection were either a failure in the throttle body or failure related to the ignition system. The two are linked as the ECU pulses the injector as it detects the engine rotating, so if the injector can't pulse, or if the ignition module or the attached crank sensor are flaky, then there will be no fuel delivery.

The easiest part to remove and bench test is the throttle body. Close inspection showed that the weather seal of the injector harness had denatured, leading me to wonder if there was an internal short in the connector. Removing the connector and inspecting the contacts showed this could not be the case.


Denatured weather seal connector: gooey!

Throttle body exposed with fuel lines removed.The throttle body is held on by the threaded rods. The star drive screws hold the two halves of the TBI together.


Top of the throttle body on the work bench.

Fuel pressure regulator and idle air control (IAC) valve. Also vacuum ports for the evap canister, MAP Sensor, and EGR valve.

Throttle position sensor, fuel ports.
Bellcrank side of the throttle body.

You can sea dust/carbon on the bottom of the throttle body gasket where air is leaked into the intake by the idle air control (IAC) valve.

A look at the business end of the injector through the butterfly.

The TPS connector is cast in an off-angle to make it easier to plug in. Nice work, GM.

Injector freed from the throttle body. No particles or scud. O-rings look perfect. This looks like a happy injector.

Injector valve stem and face. The injector looks like it's spot-welded together, so I did not try to take it apart. Besides, the screens looked very clean.

Fuel pressure regulator spring and pretension housing removed. Clean and no corrosion.

Fuel pressure regulator diaphragm and sealing surfaces. Spotless. My cars fuel system is clean! (At least, past the filters)

A view of the backside of the fuel pressure regulator sealing plate. No corrosion.
Throttle body passages. Facing towards the exit.

Fuel pressure regulator bulkhead. Clean and shiny.

Testing the throttle position sensor with an arduino. My worry had been that when warm, the TPS would send a throttle wide open signal, thus telling the ECU to NOT inject fuel. In the event the engine is flooded, one can hold the throttle open all the way, and the ECU will keep the injector off, allowing the engine to evacuate the excess gas.

 The TPS (Airtex 5s5008) puts out a 0-5V linear signal that is easily measured with an arduino or volt meter. The arduino's ability to send data to a PC where it could be logged and plotted showed that the TPS had a smooth, jitter free response. Not the problem.


Fuel pressure can be modified by moving this set screw. But why?

Where the throttle body attaches to the intake manifold. Note I scraped all the denatured rubber of the injector harness.

So, none of these provided any obvious link to the random hot start failures. The throttle body seemed fine and there was fuel pressure. That mean the next place to check was the DIS and the crank sensor.

Part Dux: Oldsmobile Cutlass Cierra/GM 2.5L I4 TBI - Won't Start Hot Troubleshooting 2: DIS and Crank Sensor

Thursday, February 4, 2016

Car Batteries: About ready to use LiFEPO4 in place of PB?

The ChevOldsmoBuiac has been having some trouble cranking on cold mornings. The battery is just barely 5 years old, so a replacement maybe in order. I cleaned the battery terminals this weekend, and the slow turning hasn't re-occured, so I'm hopefully that was the root cause. In case it is not, I was wondering if LiFePO4 batteries had gotten big/cheap enough to use as replacements. It looks like we're getting into the space where that's feasible.

The 1990 olds cutlass ciera OEM specification is for a ~650 CCA battery. A 600 CCA LiFePO4 is about twice the price, and will need some work to adapt the battery terminals. However, if it really does last 2-5 times as long, it would be the last battery I bought for the car.

While googling, I found another person who suffered the same fate and described the requirement to remove the front brace as a "Jigsaw puzzle". Was there truly no way to put the brace elsewhere?

In terms of repair work, the biggest travesty with the A-body Cutlass Ciera is that their huge engine compartment, which would seem to make repair easy, is belying close tolerances and poor organizations of individual subsystems, and an annoying predisposition of the entire vehicle to drop paint and rust. At least the parts are plentiful and cheap.


Wednesday, December 9, 2015

Need more Crass Bypass Gas: Iron Duke EGR Valve Swap

Or

The ChevOldsmobuiac's EGR valve finally died in a way that surprised me.

The majority of the A-body oldsmobile cutlass cieras on the road are demotivated by 4-cylinder Iron Duke engines.  The upshot is that the engine is shared with many other GM vehicles, including the S-10, Fiero, and of course, the Grumman LLV that your postman probably dreads driving at work every day, so there is a lot of information available about the care, feeding, and repair of the powerplant, even though there are many production line tweaks that can make swapping major components (heads chief among them) difficult if researched first.

The Haynes manual notes that the EGR Valves tend get carboned up and sieze. Part of my regular maintenance has been depressing the diaphram to ensure that the valve could actuate.
 
A few months ago, the Check Engine light started coming on after the engine warmed up (it seemed like after 15-30 minutes of operation... I could almost pick the intersection after a week of commuting), after the light went on, the engine would noticeably ping/rattle under moderate acceleration. While I initially suspected another faulty ECM module, reading the codes yielded a consistent bad EGR valve code (Code 44 also for lean exhaust).


Low and behold, with the engine at idle, the valve was fully closed, as could be felt on the back of the diaphram with engine air filter off.

Of note, the EGR valve on this car is completely mechanical: it is connected directly to the intake manifold and it is regulated by a pinhole orifice on the EGR valve body. It slowly opens and closes as engine vacuum changes: under idle, moderate accelleration, and coast, it is open. Under heavy load, it closes.


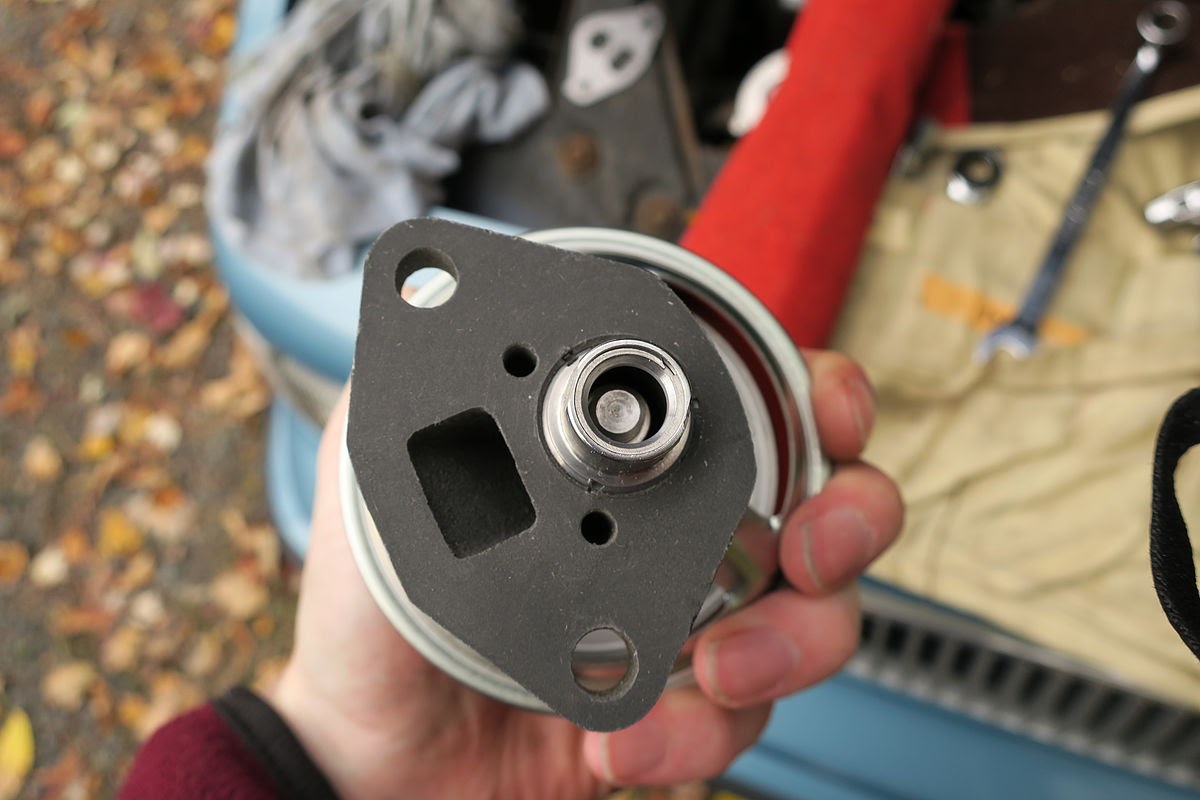
Detailed photos of the new valve:
The diaphram appears to be a silicone membrane.

Pinhole that regulates gas flow to the intake manifold.

Serial Number.

Exhaust goes into the round orifice and out the square one.

Closed position.

Open position. When you open the valve, the cover the vacuum nipple, it should stay open. Otherwise, there's a leak in the diaphragm.

The box it came in. Recognize the part number?

Old EGR valve exposed under the air filter snorkel. I should have covered the TBI, but I was on crutches with I did this operation, and wasn't interested in making a lot of trips.

Old EGR Valve. Interesting: Old part number does not match the new one. Hope this works.

Carboned up old valve.

I'm totally guilty of smearing a bit of antisieze on the port the last time I took off the EGR valve, because it was corroded on pretty well.

 Vacuum test the new valve one more time. It's kind fun, after all.

Side by comparison. Note: Hecho en Chine. I feel a little bad for whoever made the new valve, since they will probably never see any car that it is designed for. Then again, maybe I should feel happy for them, since all the cars they will see were made in this century.

Bottoms looks pretty similiar. Gasket is stuck on the old valve.


The swap was pretty trivial. It took about 10 minutes with a couple of different 13 mm wrenches to reach under the diaphram and navigate all the hardware on the top of the engine. I highly recommend a deep-offset 12 point, 13-mm wrench for this job. A flex head ratcheting gear wrench might also work, but I didn't have one to test. For completely visible bolts, they were awfully obscured.  With plain wrenches, you might have to disconnect the throttle cables to get enough swing to get the bolts out. This is not a good party for your socket set.

While you're at it, I suggest replacing the now very rusty bolts with new ones and putting a dab of antisieze on them. What possesses car makers to put iron bolts in aluminium parts is beyond me, and is certainly a sign that large portions of our engineering population failed basic chemistry.

In the end, the engine appears to be a lot happier. For a long time there's been a lingering burble/valve rattle sound that I now realize must of been pinging due to lean mixture. That sound is now completely gone. This engine does not have a ping detector, so this might be worth looking at if you have mysterious pinging. The EGR valve had to be very dead for the computer to turn on the check engine light.

Another note is that this probably means that you can't put a plate over the EGR valve on fuel injected engines without remapping the ECU to accept and adjust the mixture. I'm not sure how exactly the car knows the exhaust gas is missing from the mixture, but I'll be it has to do with a combination of manifold pressure and the position of the idle air control valve. Long story short: unless you know how to remap an ECU, getting a blockoff plate will not help you on the TBI engines. Since my EGR was failed in the closed position, it was functionally the same as a block off, and the computer remained unhappy and drivability was compromised by excess pinging.