Mountains

Mountains
Showing posts with label Is this what I want my computer to do?. Show all posts

Wednesday, January 10, 2024

My Ubuntu ZFS on Root Gripe List

I sort of love Ubuntu ZFS on root and sort of don't.

I have a lot of complaints.

(1) Almost completely missing documentation. The entire knowledge base is centered around Didrocks blog.

  • How do you add datasets to zsys?
  • How do you backup/restore this?
  • zfs complains that the pools can be updated to use new features but it's not clear if this is safe.
  • Unclear about how zfs volumes were setup. How frequently does this scrub and trim? (not very)

(2) Poor handling of file systems with lots of changes. This sounds like an edge case, but if you use steam to manage a games library and do some video or photo work on the side, you're going to find a lot of snapshot induced storage bloat. I've had to reduce the snapshots held in zsys.conf. 

(3) bpool size is too small for the kernel image rotations. I end up having to manually remove old kernels and snapshots. Complaints of this are extremely common. You can, with some pain, replace the bpool with a larger one.

(4) Unclear behavior in recovery mode. If I go back to an early snapshot, is the current dataset still fine? What happens if I make a change? -Confused-

(5)  Snapshot names are cryptic. I would have hoped for something like an ISO timestamp and a simple iterator.

(6) No configuration options at setup. Going back to the above, having a sane default is/would be great, but adding ZFS options and setting the sizes of bpool and dealing with complex zfs pools would be useful in the installer.

Overall, zsys seems like requires an understanding of ZFS to run with confidence that you won't suffer some catastrophe in an edge case. It so opaque that it's a big tradeoff to commit to zfs on root, as you need to really understand ZFS to use it, but at the same time, if you're that into ZFS, you'll find it frustrating.

Ubuntu 22.04 LTS Starts In Emergency Mode: no network drives, snapd apparmor failure, and can't mount /boot

 I sort of love Ubuntu ZFS on root and sort of don't. A main gripe have been almost completely missing documentation. The entire knowledge base is centered around Didrocks blog.

Yesterday, I started my computer from a cold start, logged in, realized I meant to turn on virtualization in the bios to use virtual box, restarted within maybe 60 seconds or less of logging in, tweaked the bios, and restarted again. Instead of a clean boot, the system started into emergency mode. I guessed that something about virtualization extentions was causing problems, and restarted, set the bios back, and restarted again, but the system still would only get into emergency mode.

journalctl -xd errors noted

(1) Snapd.apparmor errors for firefox

(2) Couldn't mount network samba shares

(3) Couldn't mount /boot

(4) bpool was missing from zfs list  

Disabling app-armor in grub did not resolve the issue (some people have had corrupted app-armor installs). Apparmor failure maybe were a symptom?

Disabling network shares did not resolve. This was a symptom of the network stack not working.

I kept focusing on fstab. I tried mounting the vfat partition labeled /boot on my ssd. This did not work. But I recalled that zsys does some kind of rotation with bpool and /boot.

Maybe something was keeping zsys from mounting boot? Did it "forget"?

I am still not sure how to guess how to mount the correct bpool to /boot.

I found this reddit discussion where someone converted a /dev/ to a uuid fstab:

https://www.reddit.com/r/zfs/comments/n26j2f/has_anyone_been_able_to_convert_ubuntus_zsys/

 Based on that, after entering emergency mode and finding that 

mount -a

could not mount boot from fstab, and that bpool was not in

zfs list

zpool list

I ran

zpool import -d /dev/disk/by-id bpool

Which correctly mounted bpool to /boot. I then exited emergency mode and the computer started normally.

I have no idea what happened...


Thursday, August 10, 2023

Dell Laser Mouse (M-UAV-DEL8) Repair Notes

I used a cheap and fairly commonly available Dell Laser Mouse (M-UAV-DEL8) for many years, and really liked it, as it provided all the features I wanted in more expensive mice (laser tracking, decent response, on-mouse tracking adjustment, and a scroll wheel with some buttons in places I could manage. I had two over time.

Over time the quality of the tracking started to deteriorate and the mice eventually became essentially unusable. Cleaning the lens under the mouse and applying compressed air or suction from a vacuum cleaner didn't improve the performance. I assumed that whatever cheap sensor or other electronics in the mouse were dead and I purchased a new mouse and the Dells went into the junk pile.

Years later, i wondered what was up and decided to open the mice for cleaning. It turns out that the optics sit on a wide piece of clear plastic and it catches dust and debris from the top of the mouse, but this is very difficult to remove without taking the mice apart. Cleaning the sensor brought it back to full performance. I also cleaned the scum from scroll wheel mechanism and inspected the click-switches.

Repair notes: 

Disassembly: 

The mouse comes apart easily. There are 2 Phillips screws under the rear skate pad. The rear pad can be removed non-destructively with knife and replaced.


 After removing the screws the mouse has two circuit boards connected with thick ribbon cables. These boards are on both halves of the mouse. You can remove the top board from the mouse by moving it left and right relative to the bottom and removing the two retention screws. 


The bottom circuit board has the side click buttons in the way. The buttons can be removed with a thin prying object like a knife or small screwdriver by prying the retention tabs inward and pulling up on the buttons.


After that, there are 2 screws in the bottom circuit board and the electronics and scroll wheel will just slide out.


Laser Optics/Lens:

To remove the lens from the bottom for cleaning, there are two small tabs that are melted into blobs on top of the laser sensor. Cut the tabs with a knife and the lenses will fall away. You can clean it with a paper towel and isopropanol. I noticed that you can see the dirt on the optics with the white towel behind it... this makes getting it clean easy... it took more than a few wipes to get it spotless.

I reattached the lens by putting 2 small dabs of hot glue on the outside fingers of the lens that go on the outside of the laser sensor.


 In the photo below you can see the big air gaps around the laser sensor, and the big lens tray that collects material that falls on it and prevents cleaning from the outside.


Scroll wheel:

I would call this a second generation scroll wheel: it has a stub that goes into a mechanism that sends pulses when scrolled and supplies the rotating resistance. You can pull the wheel out of the mechanism for cleaning.  There is a spring that provides the resistance for the scroll wheel click mechanism that is on the other end of the shaft, this catches on two small towers over the scroll wheel click switch. (I thought it was supposed to slide between the towers, but assembled this way it becomes obvious that is not correct).

Mouse click switches:

In the mouse that I paid attention to, these are Omron D2FC switches. They are through hole, so if double click issues showed up, they could be replaced. You can also attempt to repair the switch mechanism. The tops of the switches pop off by gently prying the small retention tabs of each side of the switch (be careful not to loose the small white actuator inside). I cleaned the contacts but did not attempt any spring bending. I measured the switching voltage, it's 5V, so I think they will go for a very long time.

Weights:

I removed the weights from the mice. They are held in by a single screw. At some point, a mouse is too light for me, but my preferences have moved away from heavy input devices over time.


Design notes:

To my surprise, these were made by Logitech for Dell. While I think they are somewhat unique, they have a BOM and design. (single sided PCB with through hole parts and very limited complexity) that is typical for a cheap 2000's mouse, but the core microcontroller and laser sensor are on par with some nicer mice in the era.


The mouse microcontroller is a Cypress CY7C64823 (Datasheet: https://www.infineon.com/dgdl/Infineon-CY7C63310_CY7C638xx_enCoRe_II_Low_Speed_USB_Peripheral_Controller-DataSheet-v21_00-EN.pdf?fileId=8ac78c8c7d0d8da4017d0ecc994f46c9). Nothing fancy, but it's interesting to see from the datasheet that Cypress has software that lets you basically build the mouse/input device characteristics from their library. I wildly guess it's running between 12 and 24 mhz. It can also support both low speed USB and full speed USB-2. It has 256 bytes of memory and 8 kilobytes of program storage (flash). This is a 24 pin surface mount device that I think could run directly from the ~5V USB bus with little power conditioning. I regret not following the traces, I wonder if it is using all the GPIOs? 8 button functions (Left, right, forward, back, scroll up, scroll down, scroll button, resolution), the USB bus (2 pins), and an SPI connection to the laser sensor make that seem unlikely.

The optical sensor is an Avago ADNS-7550 (Datasheet https://datasheetspdf.com/pdf-file/913766/AVAGO/ADNS-7550/1)  Notably the sensor features the same 400/800/1200/1600 DPI that matches the dell and logitech literature, as well as a 2000 DPI mode that isn't used by the mouse. I didn't track traces, but from the spec sheet, it looks like a minimum implimentation is an SPI connection to the micro controller, along with an interrupt line from the mouse to tell the controller there is activity, and then connections to 5V power from the USB bus.

The spec sheet has some interesting charts showing how the sensor acts on different surfaces.

Mine were made around 2008 or 2009 according to the date code.

It looks like, between the two mice, there were several revisions to the circuit board over time based on the revision numbers printed on the silk screen.


Sunday, April 12, 2020

Folding at Home on Ubuntu 19.10 with AMD GPU

For future reference, there's a global pandemic on at the time I'm writing this.

I found out that Folding@Home was taking on various Covid-19 research projects, and though, since I had some computer laying around not doing much, so I installed the client and let it go. However, I'm mainly a Linux user, and the my RX 460 was not getting used. I read several pieces of advice on via google. Generally, linux, opencl, and AMD gpus have to exist in certain combinations in order for folding at home to work correctly.

I've been running FAH on a workstation with Ubuntu 19.10 and a AMD RX 460 graphics card.

To get things to work, I had to
(1) Remove opencl-mesa and rcom
(2) I have ocl-icd-opencl-dev installed.

(3) Install AMD's opencl from the amdgpupro package. (amdgpupro IS NOT REQUIRED)
I used this script to do it, though I had to modify the version numbers as is described in the comments:
https://gist.github.com/kytulendu/3351b5d0b4f947e19df36b1ea3c95cbe
(4) Add <slot id='1' type='GPU'/> to the config.xml file (like this)

Bonus
(5) Disable FAHClient as a service in /etc/init.d (https://foldingforum.org/viewtopic.php?f=61&t=25328)
(6) Run FAHClient as root

The machine runs great while folding, and seems as productive in linux as it does in windows. By running from the command line, this allows the computer to quickly freed for heavy lifting, or rebooted to other operating systems.

Thursday, February 27, 2020

Converting my Old Laptop into Desktop All-In-One

or, "reddit.com/r/buildapc, eat your heart out"


In 2011 I purchased an Lenovo x120e netbook, which I used for couch internet, travel, and periodically logging GPS data from my lawn tractor.

Powered by an 1.6 ghz AMD E-350, with 4 gigabytes (and later upgraded 8) of DDR-3 ram (sadly on single channel), and a 7200 RPM hard drive, RealTek RTL8192 (or maybe 8188) 802.11n 1x1 2.4 ghz nic. It was both faster than the T42 I replaced it with and slower than contemporary full laptops (it was about 1/5th the speed of an 2011 i7 Macbook pro). Over time I replaced the battery, upgraded from Windows 7 to Windows 10, spilled a few beers on it, replaced the cooling fan, and switched to Ubuntu. It was perfectly adequate for the 2011 internet and the Radeon 6350 graphics made H.264 video and indy games great, but by 2016 it was feeling sorely underpowered, and in mid 2019 the battery was kaput, the cooling fan was buzzy, the speakers were shot, and I avoided using it online because any Web 2.0 content was a recipe for misery.


I relegated it to a drawer and bought a cheap refurb i5 dell corporate machine that is, frankly, miles better.
The X120e, at a point in time where it was still fast enough to be useful

I was waiting for a chance to recycle it, when I stumbled upon a LifeHacker where someone converted an old laptop into a workbench All-In-One (AIO). My x120e was in far worse conditions, but I knew the screen and motherboard worked, and I had an old SSD that would be a worthwhile upgrade to the spinning drive.

My motivations for this project were:
  • I prefer a mouse and keyboard for any kind of serious computing activity
  • I had stuff laying around doing nothing
  • It seemed fun to try

A major challenge for the construction would be to replace the stock CPU fan with something else I had in laying around. I have a decent collection of old computer fans and a few heat sinks, so I had high hopes to make something work.

I carefully took the laptop completely apart, as it would not be possible to mount an alternative cooling system in the chassis. I then tried different combinations of heat sinks and fans with different orientations of the motherboard behind the display. This computer runs just fine without a battery, and 9 cell battery with a 30 second run time is comically useless. so I wrapped the battery terminal on the motherboard with electrical tape, secured with a dab of hot glue, and set aside the battery for recycling.

The good news was that the display cable was long enough to support the motherboard being oriented with the cpu facing either towards the display or towards the back of the computer. However, I found it challenging to mount any of the heat sinks I had: they were all huge and the motherboard mounting brackets were not well placed.

CPU overwhelmed by a big heat sink. Note that it is touching the components.


I tried to shim the CPU with piece of polished aluminum to lift the heat sink off, but it didn't solve the mounting problem.

I ultimately decided to try a low effort solution. The e350 is rated at a mere 35w TDP, which seemed like overkill for even smallest desktop CPU heat sink I had. so I though that instead of trying to replace the whole heat sink, I could maybe just put a fan directly on the stock heat pipe and heat sink and treat the whole assembly as a heat sink.
The stock heat sink and cooler, with worn out fan attached.
With the fan removed, it was obvious that some cleaning would be needed.

I soldered the JST connector from the original cooling fan to a 120mm fan I had in the parts pile. While the 120mm fan is designed to work at 12V, it spins well at 5V and pulls less current than the stock fan. I elected to mount it so it blows outwards to the back of the case.

I made enclosure out of twin-wall polycarbonate (i.e. correlated plastic). I had a bunch from a prior project, and it is extremely easy to cut with a knife and hot glue sticks to it well.

I mocked up how I wanted to mount everything, then started cutting and gluing pieces of twin-wall. The fan was offset off the back of the display with shims.


Tabs with slots were used as legs to hold the motherboard to the back of the display. This way the fan has maximum coverage of the heat sink.

The original drive tray was kept as a drive support, and wings were attached to support the sides of the case. A baffle was also added to help keep the fan from recirculating warm.
 

 Another problem that removing the motherboard from the laptop presented was how to turn on and off the computer. The power button was molded into the base of the laptop, and the connector was a ribbon cable. I tried using the power button PCB, but the button alone felt fragile.
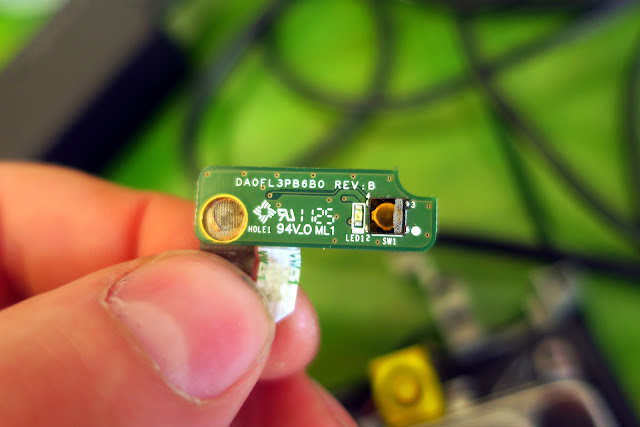
 

Instead, i cut the power button from the enclosure and glued it to the front of the display with a rear twin-wall support to keep it from snapping when pressed.


The power symbol is upside down, but it works.

Before putting the back on, I made sure to anchor all the wires (often foil shielded) with dabs of hot glue and electrical tape to keep them from getting free and either shorting out and causing trouble.

A quick test showed a happy computer with an external mouse and keyboard.


I added some holes to the back and bottom of the case, and a couple of flaps held together with duct tape for hard drive and VGA access.

I decided to return the machine to Windows 10, as it has the best driver support for the graphics card, with it's AMD VCE 3 h.264 decoder, and I wanted to have a decent experience watching videos in the workshop. As I had updated the Windows 7 installation to Windows 10 previously, microsoft recognized the machine and installation was quick and largely painless. I did download the latest drivers from AMD and Lenovo. The only snag I hit was that the Realtek RTL 8818 wireless card would not connect to our new wireless router. This wasn't surprising, as the wireless performance of the machine had always been bad (at points, we actually suspected it to be so bad that it was slowing down other machines on the network). However, no combination of RTL-8192 (or 8188) drivers or settings I tried would yield it detecting our 802.11AX router. From what I read, Realtek never got a working driver set for it. I eventually bought the bargain TP-Link T2u-plus recommended by wirecutter, which thankfully did work out of the box, though it worked a lot better with the TP-Link Drivers vs the stock drivers from Windows Update. That brought the total cost of the project to something like $17.


Frankly, the quality of the connection with the new wireless card does not seem any better than the old one. While the Windows claims a high speed connection to the router, internet speed tests show the x120 can only handle internet browsing at around 10 megabits, and copying files to and from the file server is limited to around 200 megabits. Both scenarios appear to be bottlenecked by the CPU, which goes to 100% in the task manager at the slightest provocation.

In order to get decent video playback performance, I installed chrome with the h264ify plugin.


To hold the machine upright, I used an old cookbook holder that was gathering dust.

Behold, the workshop computer.
To test the stability of the system, in installed BOINC and Seti@Home. After an hour of running 2 CPU+1 GPU work units, the enclosure becomes slightly warm, but the machine is stable and most of warm air is leaving through the heat sink, so the fan design is functional, though not "ice cold". (Though, I have never felt the x120e was a cold running computer, like many users it's always somewhere between warm and very warm).

If I ever take the box apart (the irony of going full apple and building a PC with glue not screws is not lost on me), I'd take another crack at the cooling solution: I realized that the original copper cooler could be soldered or brazed to a larger piece of copper or aluminum, thus solving the mounting and size problems I encountered trying to attach desktop style heat sinks.

My major complaint was that I didn't not find a way to build speakers into the machine. I'll have to attach something externally via the 3.5" jack.

Also, I was surprised by the time it took to build the box: it took almost a full day to dissasemble the laptop, figure out how to orient all the parts (screen, motherboard, power button, USB, power, and vga ports, then somewhat carefully measure, cut, and hot glue twin-wall pieces until the unit not longer looked and felt like a cereal box full of wires and circuit boards. I certainly would NOT recommend buying an old computer for this: just get a raspberry pi or used PC if you are starting from nothing.


Monday, February 13, 2017

Thoughts fixing on Stuck CD/DVD Drive Trays

I built my computer with two DVD Drives that I had reused from other other computers. This is handy because when I have digital media to read or write from a disc, there's normally more than one required, and because, short of Blu-ray, the drive speeds mostly haven't changed since 2007 or so. I could have added a third, but the motherboard does not have a second PATA channel to support it. Thus there is a third drive, probably the only one that was purchased alone, in a USB enclosure.

The two drives in the PC are
Samsung SM-348B CDRW/DVD
NEC DVD +/- RW ND-3450A
And the Drive in the enclosure is a
LiteOn DVD +/- RW -RAM DH-20A4P

On a recent audiobook transcription project, I found that both the Samsung SM-348B and the LiteOn DH-20A4P no longer wanted to open without mechanical assistance. Some investigation showed that depolymerization of rubber parts (where the rubber deforms and becomes sticky) was the culprit in both instances, though the problems were distinct for each device.

The Samsung has a foam rubber gasket around the front of the drive tray, presumably to keep dust from getting into the mechanism. When the drive ejects, this seal was getting caught on the front bezel of the drive as the tray tried to slide out, blocking it's path. I could help it eject the catching the tray with my fingernail as it pushed out a bit after I hit the eject button. The front part of the tray can be removed by gently lifting two tangs on the bottom and sliding it upward, allowing the gasket to be removed. Upon removal, the gasket was obviously deformed, smushed wide, and quite sticky, which was probably helping it latch on to keep the tray from opening. I trimmed the gasket with scissors and reversed it so the sticky part faced the front of the drive tray, yielding a non-sticky surface between the tray/bezel contact. There still some residual smudge on the drive tray, but it opens reliably now.

The LiteOn was more of a humdinger. Hitting the eject button yielded some small mechanical noises as the mechanism tried to open, but the tray didn't budge and it couldn't be coaxed to open by pulling. It required a strong assist by using a paper clip. I took the metal enclosure off the drive, yielding it's plastic frame and internals. There was nothing apparently wrong. Had I tested at this point, I would have found that it ejected smoothly in this state. However, I incorrectly assumed a lubrication issue and applied some thin silicone grease to all the sliding surfaces in the drive. After lubrication, I powered the drive and found the naked mechanism worked smoothly, concluding I had solved the problem, the drive was reassembled and put back on the PC, where it promptly refused to open, as before.

Several repeat inspections failed to find the problem. Testing showed that the drive would open when naked, but when the protective metal shell was in place, it would get stuck closed. I initially concluded that the rubber drive band, a square belt of about 25 mm diameter, between the motor and the tray gear train, was worn out. This part fails commonly enough that they can be purchased on Amazon. This seemed rational as I could see the spindle spinning under the belt when the drive was trying to open the tray. However, the belt was under good tension and everything looked OK. It also did not explain why the drive worked fine when the case was removed. The drive also ejected ok when the plastic frame was manually torqued in various ways, so it seemed unlikely that metal enclosure (which was in find shape) was distorting the drive mechanism.

A google search showed a post in the digitalFAQ forum where a user complained that they were having problems with a drive leaving "gunk" on the center of CDs, and suggested that the drive spindle was sticking to the bearing in the top of the drive when a CD was not present. It took a moment (meaning, several hours) for the implications of this to sink in for me. The drive ejects by lowering the drive spindle to allow a clear path for the tray to slide forward. When a disk is inserted, the spindle raises and presses the disk into a bearing on the top of the drive house. If there's not a disk present, and the spindle is sticky, it will adhere to the drive housing lid (aha!). When a disk is present, there's a few millimeters travel which gives the mechanism enough momentum to break free.

Thus, I resolved to "solve" the LiteOn problem by storing the drive with a blank CD-R inside of it. If it starts having problems with ejecting, I'll probably employ the talcum powder trick to dry the rubber surface.


Wednesday, December 9, 2015

Need more Crass Bypass Gas: Iron Duke EGR Valve Swap

Or

The ChevOldsmobuiac's EGR valve finally died in a way that surprised me.

The majority of the A-body oldsmobile cutlass cieras on the road are demotivated by 4-cylinder Iron Duke engines.  The upshot is that the engine is shared with many other GM vehicles, including the S-10, Fiero, and of course, the Grumman LLV that your postman probably dreads driving at work every day, so there is a lot of information available about the care, feeding, and repair of the powerplant, even though there are many production line tweaks that can make swapping major components (heads chief among them) difficult if researched first.

The Haynes manual notes that the EGR Valves tend get carboned up and sieze. Part of my regular maintenance has been depressing the diaphram to ensure that the valve could actuate.
 
A few months ago, the Check Engine light started coming on after the engine warmed up (it seemed like after 15-30 minutes of operation... I could almost pick the intersection after a week of commuting), after the light went on, the engine would noticeably ping/rattle under moderate acceleration. While I initially suspected another faulty ECM module, reading the codes yielded a consistent bad EGR valve code (Code 44 also for lean exhaust).


Low and behold, with the engine at idle, the valve was fully closed, as could be felt on the back of the diaphram with engine air filter off.

Of note, the EGR valve on this car is completely mechanical: it is connected directly to the intake manifold and it is regulated by a pinhole orifice on the EGR valve body. It slowly opens and closes as engine vacuum changes: under idle, moderate accelleration, and coast, it is open. Under heavy load, it closes.


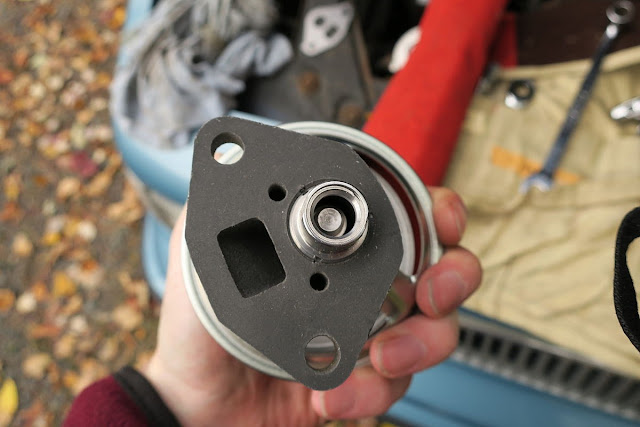
Detailed photos of the new valve:
The diaphram appears to be a silicone membrane.

Pinhole that regulates gas flow to the intake manifold.

Serial Number.

Exhaust goes into the round orifice and out the square one.

Closed position.

Open position. When you open the valve, the cover the vacuum nipple, it should stay open. Otherwise, there's a leak in the diaphragm.

The box it came in. Recognize the part number?

Old EGR valve exposed under the air filter snorkel. I should have covered the TBI, but I was on crutches with I did this operation, and wasn't interested in making a lot of trips.

Old EGR Valve. Interesting: Old part number does not match the new one. Hope this works.

Carboned up old valve.

I'm totally guilty of smearing a bit of antisieze on the port the last time I took off the EGR valve, because it was corroded on pretty well.

 Vacuum test the new valve one more time. It's kind fun, after all.

Side by comparison. Note: Hecho en Chine. I feel a little bad for whoever made the new valve, since they will probably never see any car that it is designed for. Then again, maybe I should feel happy for them, since all the cars they will see were made in this century.

Bottoms looks pretty similiar. Gasket is stuck on the old valve.


The swap was pretty trivial. It took about 10 minutes with a couple of different 13 mm wrenches to reach under the diaphram and navigate all the hardware on the top of the engine. I highly recommend a deep-offset 12 point, 13-mm wrench for this job. A flex head ratcheting gear wrench might also work, but I didn't have one to test. For completely visible bolts, they were awfully obscured.  With plain wrenches, you might have to disconnect the throttle cables to get enough swing to get the bolts out. This is not a good party for your socket set.

While you're at it, I suggest replacing the now very rusty bolts with new ones and putting a dab of antisieze on them. What possesses car makers to put iron bolts in aluminium parts is beyond me, and is certainly a sign that large portions of our engineering population failed basic chemistry.

In the end, the engine appears to be a lot happier. For a long time there's been a lingering burble/valve rattle sound that I now realize must of been pinging due to lean mixture. That sound is now completely gone. This engine does not have a ping detector, so this might be worth looking at if you have mysterious pinging. The EGR valve had to be very dead for the computer to turn on the check engine light.

Another note is that this probably means that you can't put a plate over the EGR valve on fuel injected engines without remapping the ECU to accept and adjust the mixture. I'm not sure how exactly the car knows the exhaust gas is missing from the mixture, but I'll be it has to do with a combination of manifold pressure and the position of the idle air control valve. Long story short: unless you know how to remap an ECU, getting a blockoff plate will not help you on the TBI engines. Since my EGR was failed in the closed position, it was functionally the same as a block off, and the computer remained unhappy and drivability was compromised by excess pinging.


Saturday, November 28, 2015

Lenovo x120e 802.11n Wireless Data Corruption with RTL 8188CE 1x1 NIC

I've known that this wireless card was toxic for a long while.

However, laziness has meant that our household has been trapped in 802.11g land for years and years, even as I gave 802.11ac routers to family members as gifts.

Because the shoemakers children have no shoes or something.

Anyhow, I knew the Thinkpads* Realtek RTL 8188CE wireless card was bad news when the other machines started experiencing network instability whenever it was active on the network. The wifes Netflix stream would glitch. Copying files requires 100% of the CPU, and similarly, network intensive multiplayer games took it in the chin as the CPU was soaked by the NIC, detracting from rendering.

But, I recently got the joy of trying out one of the 802.11ac routers that I had been gifting (Asus rt-ac68u), and was pleasantly surprised by the speed (the adapter reported speed of up to 150 mbps) and unpleasantly surprised by how all the data that came through the pipe was more or less ruined by the experience. Installers claimed checkup errors, binaries wouldn't run right, and webpages and other internet content looked a little...weird.

An example corrupted page from this blog

The network interface showed itself as a possible candidate when other machines in the house didn't have the same issues, and I found that downloading the same file several times yielded different checksums each time. I was particularly ticked off when my linux virtualmachine a) had trouble getting updates b) once updated couldn't stay booted for long, presumably because of data transfer errors. At first, I thought this was due to an old version of virtualbox, but then when I tried to update virtualbox, it complained of .cab checksum errors. Running hashmyfiles on windows 7 showed that each time the virtualbox installer was downloaded, I got a different checksum. Of course, I was suspicious of that too, but it was all I had to work with.

Crazy.

Sadly, There is little information avaiable about this situation and what can be done about it. After a day of fiddling, I determined that the RTL 8188CE can be forced into 802.11g or 802.11b mode, which home use had more-or-less shown to be less error prone. To force 802.11b or 802.11g, activate Taskbar->Wireless Icon->(Your Wireless Network)->Status->Properties->Configure->Advanced->Wireless Mode->802.11b/g (or 802.11b). Setting "Auto" will allow 802.11n, and thus data corruption, at least in my usage scenario. Corruption was greatly reduced (i.e. I could download files and view websites normally) with 802.11g forced (by selecting 802.11b/g mode).

I had read in a few places references to errors generated by the TCP/IP checksum offloading feature of the card, though it seems possible that the checksum maybe fine and in fact the card is not moving data correctly.

Things to meditate on:
1) Checksum are valuable to making sure data makes it from point a to point b without getting fubared.
2) All the advice about hacking the bios to remove the pcie whitelist to allow other mini pcie NICs is probably well founded.
3) The RTL 8188CE is just painful on this machine. Neither realtek nor lenovo have fixed the drivers, and data corruption is evil. I have to ask myself if other issues i'm experiencing on the machine are a product of running windows update through a leaky wireless pipe.
4) Curiously, the RTL 8188CE is not mentioned in the list of 802.11n adapters provided by Lenovo, but Broadcom 43225 and Intel 6200 (6250 as well) are. They would seem like rational upgrades.
5) The 2x2 abgn adapter chipset/part number relationships reported online are all over the map. The Lenovo FRU 60Y3253 corresponds to both Intel and Broadcom chips.

*More like Stinkpad amiright?


Thursday, March 28, 2013

Cloud Free Sky

I was reading an article in Scientific American that discussed the economics of running ad-supported cloud services.

It brought about the realization that that the reason why all cloud services don't stick around, even though people love them. Cloud services need to make money to survive. The ones that don't make it either don't supply good data for targeted advertizing, or they don't attract enough eyeballs to get ad revenue, or refuse to charge a fee for some reason.

So, ask yourself: does my favorite cloud service give a company a rich, solid feed of information about myself? Is it useful as a large scale advertizing tool? Where does it get it's money?

If you can't answer that question, pull your data and run.


We can apply that model explain a lot of things: the death of mashups (no revenue is gained by providing content for other companies mashups), and the subsequent lockdown of Facebook and Twitter APIs. It's the writ reason for the shutdown of Tinkercad. Reader, especially in it's neutered social-free form, could only give vague information about favorite sites, and by design obscured the important information from stakeholders. The death of the many subscription/DRM music services also follows the trend.

This theory would also suggest that the personal computing device is not in particular danger of death, as there are many areas of computing that will strongly resist the cloud model of monetization. Shareware developers rejoice.

Thursday, January 24, 2013

Programming Shoot and Ladders

In college and highschool, we (really, the ubiquitous We, since i'd have this conversation with anyone who cared), spent a lot of time discussing the merits of different programming languages, about which model worked best and which was fastest for a given application. I spent a lot of time at work and home tinkering with different languages. Fortran, C, shell script (tcsh & pdksh), javascript/html, VB, perl, Igor, and labview.

However, I'm a career chemist, not a computer scientist. My goals are very much focused on cranking publications and not fine tuning code. I've come to realize the best tool for a lot of problem is the one you have to effectively solve the problem. One example: at work, one of our visualization products is written in Delphi. I doubt that would be the tool of choice for many people, but the scientist who is the PI knew pascal really well (back in the 1980s!) and it has stuck over time.

Of course, the tool you have works great, until you reach its limits. I use Labview for instrument automation. It has a easy to use GUI toolkit, and knows a lot about hardware and signals, right out of the box. Yesterday, I found something it doesn't know much about: drawing arbitrary graphics on screen.

 I'm building a control package for a vacuum manifold that preconcentrates gases before injecting them into a gas chromatograph. I thought it would be nice to give a visual representation of the flow paths that were open by drawing the manifold on screen. It turns out, labview doesn't give you many tools to do easily do that:

What this image is showing is that Labview's 2D drawing stack is entirely procedural, with no facilities for storing, moving, or transforming images after they've been created. Anytime your program wants to update an image screen, the code you write needs to explicitly redraw the entire image. It's not possible to algorithmically create a sprite library, then scoot the sprites around, or rotate or otherwise transform them. You have to build a bunch of routines that describe objects and then push those around.

Pain.

This means that it's going require writing quite a bit of code to make a panel that easily represent the open flowpaths to the user. Achieving that kind of functionality is not a high priority for the project, so for the time being, it will fall back on using more generic, less descriptive indicators.

If you're standing in front of the hardware, it's possible to guess what this means, but I think that's going to be beyond the grasp of inexperienced users, so I consider the solution to be suboptimal. Experience has shown that analytical error rates scale with the steps the analyst must complete and the clarity of state and hardware protection that software can provide. This panel doesn't clearly show linked flow paths, or if the instrument really knows if gases are moving or pressure tolerances are being exceeded.

Things could be a lot better.

Monday, February 28, 2011

OpenAPC: What's this?

http://www.openapc.com/

What's this?

I've been sort of hoping for an open source competitor to Labview. The lack of a home edition has been somewhat depressing. Also, Labview can be a little slow on older hardware. One of my programs takes several minutes to compile on a 3.2 ghz PIV...