Mountains

Mountains
Showing posts with label Volvo. Show all posts

Saturday, November 5, 2022

Volvo 740/940 Foglight Switch, General Dash, and Seat Switch Rebuild

The fog light switch in my 740 suddenly locked up and refused to actuate a few years ago. Because it's never very foggy, and for a while I had a modern car that I drove when the weather was ill, I put "new switch" on the list of parts to accumulate, and then stopped thinking about it. But, I recently had the opportunity to re-fix the clutch pedal that broke so long ago, and while I had the dash apart, I thought, "Why not".

The obvious answer being that 30 year old plastic is fragile and snaps at the slightest hint of stress. Kind of like me.

The dash plate pops out. The switch is disconnected from behind.

Switch slides out.

Switch comes apart by pressing in 4 tabs around the back. The switch action is a metal finger with a spring inside of a post.

The back half of the switch. Has the light bulb and the contacts. The mechanism sea-saws to open and close the contacts.


The reason the switch was stiff is that the grease inside the post had hardened and prevented the spring from compressing. Additionally, it seemed like the finger had oxidized a bit and expanded inside the post. I removed the grease, sanded the finger so it moved in the post freely, and then added new silicone grease.


'Reassembly is reverse"
 

Friday, November 19, 2021

Volvo C30 Taillights, Parking Lights, and City Lights Won't Work/Won't Stay On: Meditations

My sincere hope in buying a newer used car was to get something that was so reliable that I didn't have to work on it on a monthly basis to keep it rolling. After several years of 2-3 days of month lost under a car, I was really looking forward to getting a little time back, and getting a little more confidence in driving further that I could walk.

It turns out that was a bit of a pipe dream. I bought the C30 in June and 5 months later I've basically spent some time every weekend wrenching on it, meanwhile every other car has required comically little attention (if you call dropping an exhaust system and re-welding all the leaks "little").
 
In terms of time and money I would have come out ahead by doing nothing.

One of the problems that has been difficult to solve had with the Volvo C30 is that the right side taillight/parking light, and the left side city/parking light sometimes won't stay on. They will illuminate for a few seconds when switched on (light switch from "off" to "parking" with the key out, or when the car is first started, but then they turn off.
 
The P1 Volvos (V50/S40 II /C70 II/C30) all power these lights using an electronic system (Central Electronic Module, CEM) instead of a traditional switch/fuse system. The CEM powers the taillights and park lights by providing a controlled voltage output using PWM and that is current monitored instead of fused. The upshot of this is that if there is a short in the system, the CEM stops power output, and it can also detect a bulb out and put a warning on the dashboard or store a diagnostic trouble code. The behavior of the system is also software defined, so bulb brightness, blink rates, and such can be easily tweaked for different jurisdictions, and the module can be reused in different vehicles. The downside is that it is difficult to troubleshoot and not very resilient, in particular, if it detects a short, it will stay off until either the car is restarted or (when key is off/out) the lights are cycled.
 
The taillight problem started a week or so after I got the car and was very active for a while, but then suddenly vanished, and has only intermittently manifest.
 
 
Troubleshooting notes:
  • During the few seconds it was on, voltage at the right tail lights were lower than the left by about 0.2-0.5V.
  • Prior owner had installed LEDs in the front city and running lights, some of which had failed. I replaced these with OEM spec bulbs (W5W and WY5W amber). 
  • I removed the CEM module (after disconnecting the battery!): no corrosion/water signs visible, I cleaned the contacts and added zinc electrical grease.
  • The headlight housing internals look fine as does it's connector and pigtail.
  • The taillight bulbs and bulb holders look fine: there no obvious way for them to short.
  • The system provides current from the CEM so the grounds are (probably!) fine, especially since things that share the grounds points (headlight, break light, backup light, turn signal) also work fine.
  • The CEM still cuts power if the headlight or taillight plugs are removed. If there is a short, it's not in those assemblies.
  • I found an intermittent short in the license plate light harness, which I thought fixed it, but that was apparently a red hearing. But the plate illumination is now 100%.
  • The key fob has a parking light illumination button that is extremely helpful for testing
  • Once the lights are working, it seems to go great until I find a big speed bump.
System Design Notes:
  • The wiring diagram shows that the CEM internally bridges pins C:12 (right rear tail light) E:13 (left front parking/city light) and C:13 ( License plate lights).  


  • Without ripping the carpets and trim out of the car, I'm not completely sure, but it looks like the right tail light wires go up the passenger side under the passenger seat, the license plate light wires go under the drivers seat, and the left parking light/city light go through the fire wall.
  • Based on the skbowe CEM teardown, I suspect these CEM uses the Infineon BTS443P 25A Smart Highside Power Switch. Each of the tail light bulbs is about 8W/1A, and the next most powerful high side components in the CEM are limited to 3A: it's unlikely they are ganged up.
  • The BTS443P has load sensing, current limiting, thermal shutdown, and overload shutdown features. 
  • Overcurrent sense is internal. While typically 65A is the cuttoff, it can range from 35 to 110A (!)
  •  It's not clear from the datasheet or the Volvo documentation I have if the CEM reads the overload pin, or how the BTS443P responds after a short is removed.
  • There's a big loop of wire for the license plate lights that's wiggling and dangling behind the rear bumper. Maybe this is stretching/wearing over time.

Similar failures elsewhere with no clear solution:

Eventually bridged the circuit: https://www.swedespeed.com/threads/tail-lights-and-license-plate-lights-out.587303/

Symptoms match: https://www.fixya.com/cars/t12578795-v50_tail_light_failure

Not sure if this is a P1, but bridged the circuit: https://volvoforums.com/forum/volvo-s40-11/lights-out-bulbs-fuses-fine-75174/

 Bad license plate pigtail: https://www.swedespeed.com/threads/license-plate-lights-not-working.489090/

 Cites this post: https://www.swedespeed.com/threads/licence-plate-lights-removal-cannot-remove.152646/

License plate light troubleshooting:

https://www.swedespeed.com/threads/licence-plate-lights-removal-cannot-remove.152646/


Friday, November 8, 2019

Volvo 740 Wagon in-Tank Fuel Pump Replacement

I'll be honest: this is a thing I had been ignoring for years because I didn't consider it was a problem. Then like when you get a weird rash, I started googling and determined the car had cancer.

Newsflash: the car may have been fine.

The core issue was that when the gas tank on my 1990 Volvo 740 was below about 1/4 tank, a pronounced, irregular tone would often develop, coming from the fuel tank. If you say "Wahhhhhh-wah-wah-wah-wahhhhhhhh" you'll approximate it well. Like this video, except lower pitch.

The brickboard FAQ suggested either the in-tank pump for the fuel pressure regulator (FPR). The situation seemed like a dying in tank pump as described by others, so I elected to replace it, as it seemed like it would be just as easy to replace it as test it. Sadly, I was wrong on the last point.

Getting to the pump on the 740 wagon requires completely lowering the rear seats, removing three bolts retaining a floor panel, then lifting and sliding the panel foward to unhook it from two brackets on the floor. The panel was designed to move freely, but a glob of adhesive from manufacturing had gotten trapped under it, and I had to pry it up on all sides to break it free enough to allow it to slide forward. It's plywood, so it could be fixed pretty easily if it got damaged.

Under the panel is an access door to the fuel tank piping and electronics assembly. In the picture below you can see it's position in the car. It also shows how I used a strap wrench to unscrew the collar.


View of the piping and wires going to the tank. The two big pipes at the top of the image are the fuel in and vapor return, the two on the bottom are fuel to engine (upper pipe with screw clamp) and fuel return (lower pipe with spring clamp). The thin hoses are for vapor recovery (charcoal canister). The wires go between the big hoses and enter the tank through a bulkhead. This IS NOT a connector! Do not pull on the plastic to try to remove it from the sender unit. The the wires must be unplugged in the body of the car and fished out.

Every clamp on the unit was so rust it had to be cut off. For some reason volvo couldn't be bothered to install stainless parts here.

I cut the clamps with a low speed rotary tool to keep the sparking to a minimum. When the hoses are intact and connected, there isn't any fuel vapor, but it still made me nervous. On the way out, I re-assembled it with new stainless steel clamps.

After removing the hose clamps, I disconnected the pump power and sender cable. It's the black jacketed wire in the image below and goes into the driver side wiring loom in the back of the wagon. It's under the rear seat and covered by a couple of trim panels. I think the other cable with the box in the middle is the speedometer. I had to loosen the brackets supporting the filler pipe and cut a bunch of cable ties to get everything free. Then I fished it out of the body so the sender unit could be completely removed.


After removing all the hoses, (some of which were dry-rot and needed replacing) I loosened the collar with a strap wrench. After this, the sender can be gently pried out with big screwdriver. It has to be rotated during removal to lift the pump and float over the fuel tank baffles.


Mine was pretty rusty. I gently brushed it off and sprayed it with rust reformer paint when I put it back together.
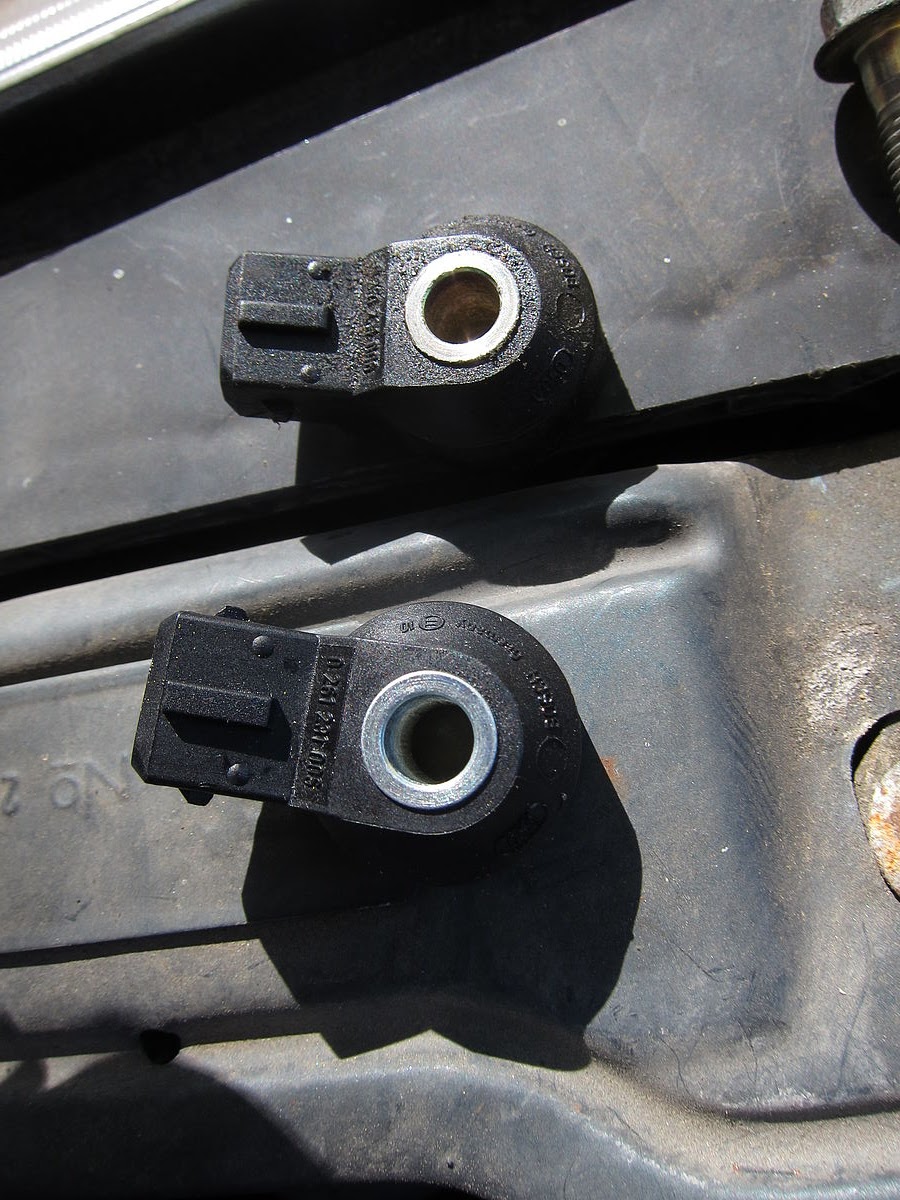
A volvo part number

The pump and connection tube looked fine. Some other owners have complained that this hose had spilt and started leaking.

Backside of the wiring bulkhead. See? I told you it wasn't a connector.

Blow out pump sock.

I got the Dephi pump to replace the OE VDO pump. Basically because the delphi had a nice looking kit. Sadly, the kit did not have the filter sock!


The inside of the VDO pump

The delphi pump has an extra lip, I had to modify the pump holder for it to fit. The delphi has different vane geometry.

The new pump installed.

I couldn't find a new sock at my local parts store for the Volvo, but I remembered the sock for my 1990 Oldsmobile cutlass ciera looked about the same, and they had a few of those. Turns out its a wee bit bigger.


Between tasks, I tried the old pump in a tank of water. It pulled about 1 amp and gave a smooth, even tone that matched the general tone I heard when the fuel was low. It also seemed to push fluid strongly and consistently. It's hard to believe the pump was having problems from this test, though it would not likely overheat in a gallon of water. I made a note to replace the FPR after this test, as it could be the source of the issue. Fortunately, the FPR is less likely to leave the car dead on the side of the road.

The fuel filler pipe. Only installs one way.

The part number of the fuel tank collar. I had a lot of problems cross threading it and I was worried it would break. Annoyingly, this appears to be the PN for the whole sender.

Re-assembled. I cleaned the rust from the edges of the hole and painted it with rust reformer.

In retrospect, I should have just pulled the fuel return line and measured the discharge rate and watched the current draw at the connector with the ammeter. It was a huge investment of time and effort to cut clamps and replace fuel tubing that got damaged during removal. Additionally, replacing the FPR is a comparitively easy task. It seems like testing those two cases before replacing the in tank pump is a better route.

In the end, it's unclear if the new pump is much better than the old pump. The new pump is silent when running, and the car seems like it has a prompt hot-start now.

I also wonder if, for the effort, it would have been better to switch the tank pump to a high pressure pump like a Walbro 255 or 350. I've read a couple of forum posts about it:
https://www.matthewsvolvosite.com/forums/viewtopic.php?t=89760. Overall it sounds like simpler system.

Wednesday, December 9, 2015

Auto Parts Epiphany

I'm beginning to think, nay, truely believe, that most replacement car parts, even OEM replacement parts, are inferior to the components originally installed on the car.

The immediate case in point is the parking brake cables on the ChevOldsmoBuiac, my 1990 GM a-body oldsmobile. The original cable worked perfectly for 20 years, though it eventually seized, piece by piece (it has 3 sections), over the past 5. A few years ago I replaced the last piece and thought I was good forever.

These cables seize because the outer sheathing coils rust and expand, constricting the nylon coated inside. The new cables apparently had inferior environmental protection, and so now have suddenly decided that they can barely budge.

Similiarly, the original brake cylinders (rear) and brake calipers (front) have required periodic replacement due to leaks and seizing every few years since the originals were replaced in 2007 or so. If memory serves, we're on the third set.

We also blow through rear pipes and mufflers at a rate of one ever 3 years. It's kinda nuts.

Far cheaper than a car payment, since I'm doing the work, but still kinda nuts.

I don't think this holds across the board, of course, I swapped the OEM shocks and struts in the Olds for Monroes in 2005 and they've been great. I only am thinking about replacing them now due to dry rotting bushings and the impressive amount of rust present.

Perhaps a descerning shade tree mechanic would do well to attempt to source and install only premium parts.

Except I mostly do that, and it doesn't seem to help.

Saturday, November 1, 2014

Lil' Wheezer: Fun with a Siezed Volvo Airbox Damper

Emissions controls on cars are great things, they keep cars from emitting vast quantities of pollutants that make breathing a miserable experience. They are also quite awful, since they add complexity to a vehicle, decreasing reliability, and, in some scenarios cause emissions to be worse than no controls at all.

Take, for example, the air damper in B230 and Volvo. The damper moves back and forth to control air coming from outside the car or from over the exhaust manifold, thus keeping the air entering the engine above ~55 degrees F but below whatever the exhaust temperature is. This is for several reasons. First, the computer apparently lacks an in air temperature correction, meaning that temperature extremes lead to inaccuracy in airflow estimations, which in turn, result in lean or rich running conditions (hurting economy and also making for worse emissions if not controlled). Second, without warmed air, ice can form in the intake under cold, humid conditions, causing intermittent failures. The downside to using a simple wax motor thermostat is that there is no indication if it fails, and, if it fails in the hotair only mode, it ends up making emissions much worse and will eventually kill the mass flow controller with the extremely hot air from over the exhaust manifold.

Like a lot of other people, I'd been wondering about some stuff my volvo 740 was doing. The fuel economy has been off since day one, and I noticed that the car got really really lazy when it was hot, and it tended to start to stumble a bit in traffic jams on warm days. Also, I was annoyed that it just barely passed emissions, with hydrocarbons being just a few ppm below failing.... So I decided to take apart the air box and test the thermostat.... It certainly didn't seem like it was working.


Getting the air box out was a bit of a chore. It's held into to the engine bay with a bunch of big silicon rubber grommets. They don't like to let go. Then the damper assembly is jammed into the side of the airbox, and requires some careful prying with screwdrivers to get some figures to unlock, then the friction between the conical assembly and the airbox housing must be overcome, all without snapping any 25 year old plastic. Fun times.


Freed of the housing at last, the thermostat was frozen at about 20% cold, 80% hot.

I dug through the parts drawer and found an equivalent shaped bolt and installed it in the airbox, and enjoyed a summer of powerful and smooth motoring.

The thermostats are pretty cheap. As I write this, there's one inbound from IPD volvo.

I'm considering putting a cheap mechanical thermometer in the airbox so I can check it more easily


Monday, August 25, 2014

A Small Difference in Stature: More on Volvo B230 oil filters

I buy oil filters for the cars from Rock Auto in bulk when on sale, and usually in conjunction with other parts. That way filters can be had for a few dollars each at most.

The current set of spares for the Volvo 740 (B230 I-4 engine) are motorcraft.

While the Motorcraft FL-332 filter does spin on as a replacement for the Mann W917, the Motorcraft, is is about 1/2 inch taller. The o-ring is in a slightly different location as well, so I cleaned the mount well to be sure no grit got entrained.

The date on the old filter is correct. The volvo is only driven a few thousand miles per year, so annual oil changes are something of a waste.


Monday, February 3, 2014

Honk and Wipe: Volvo Horn Button Fun

One of the Volvo's favorite tricks is to turn on the rear windshield wiper when the horn button is pressed. Sometimes the horn can be tricked in to sounding by pressing hard on the steering wheel on one side or the other.

This is a known issue, stemming from a grounding problem in the wheel. The steering column has several joints that can telescope and move, so that if the car is in an accident, the driver won't be crushed by the steering column. The electrical connections in the joints seem to be poor.

A pesky grounding problem, at that. I spent half an hour with a set of gator clips and could not conclusively determine the point of fault. A contributing factor is that the 1990 Volvo 740 does not use a horn relay, instead controlling the entire current need to drive the horns (did I get 3 amps on that, Kenny?). A weak connection that shows conductivity may actually be resistive under load.

The circuit is a bit unusual because the horns always have +12 volts, and pushing the horn button completes the circuit.

The maddening thing is that a working horn is -required- to pass Virginia Safety inspection. (To be clear, the inspector has always managed to make the horn blow and thus the car has never failed because of it. That said, the horn sometimes refuses to blow (though the rear window is very clean, thanks) for me when I conduct random inspections.)


Chimera.

I wanted a little red button to blow the the horn that looks like this:


Thus, I went about making a horn-always-passes-inspection button. I decided to put on a blank plate that resides in the bank of switches to the left and right of the steering wheel. I went to Radio-Trash, and purchased a large, red button and some wire taps, popped the blank plate out (it has to large tabs holding it in), and then did some precision drill work on the floor of the basement.

 Pretty much everything you need to get your beep-beep on.

Precision drill work:

I took the horn, installed in the switch plate, with two thick wires soldered on, back to the car and popped it into the dash.

The electrical connections proved to be a bit of a rats nest, because the color of the horn wire is not clear in the Haynes book (brown and yellow or brown and blue, or is it blue and brown?!). The cowel comes off the steering wheel cover quite easily, so I traced the horn wire back to the contractor. In this car, it's blue and brown. It's the wire connecting to the center of the spool shaped contractor.

A view of the underside of the steering wheel. There turn signal cams are visible here, and it's more obvious why the wipers go when the horn button is pushed... the various switches and stalks all live in the same assembly.

I attached a tap to the horn wire on the big block connector (left) and then choose an handy black ground wire and tapped the other lead. Pushing the button closes the circuit, allowing current to flow through the horns.


Wednesday, November 20, 2013

Li'l Tommy Knocker: The Joy that a New Knock Sensor Can Bring

Our Volvo 740 (1990 B230f with 368000+ miles) has not been a smooth operator, at least not in the three years that have passed since I saved it from the scrapper. Things have incrementally gotten better as I have moved through various ignored and differed repair and maintenance tasks, but it is still some distance from original performance, whereas the ChevOldsmoBuiac is usually ~90% of new.

Part of the Volvo's problem is engine related. Things got better when I replaced the long worn plugs, and stopped the oil leak into the distributor that was causing misfires. It still bothered me that the engine tended to lug in high gear, moderate speed, and moderate RPM. Pinging 2k rpm seemed unusual. I had ignored it, but this summer, it seemed to get a bit worse.

As a wild guess (that I later justified using a note on swedishbricks), I replaced the knock sensor. It is a true one-bolt job and it's conveniently located on the side of block where it's in easy reach. You can even fit a normal ratchet with a normal socket into position with clearance! It's like it was designed to be replaced! I practically threw a party when I realized the swap would be done before the coffee got cold.

I didn't really expect the replacement to improve anything; usually I'm wrong when I think a sensor is bad. However, in this case, I was immediately rewarded with an engine with smooth power delivery at low RPM.


Given that the symptoms were not super-obvious, the old sensor must have had decayed sensitivity. Inspecting the old and new did not reveal any signs of failure, and, frankly, a little cleaning would make them almost indistinguishable.

Thursday, February 28, 2013

Same River

Do you think I take the same photos all the time, or is that just what I tell myself? Do I love it? No. I want better.

On with this show.

I tried to take a picture like this a while a go. Maybe a year. Maybe two. I keep botching it by moving the camera. I either need to concentrate, get the tripod, or pony up and crank the ISO more. This one is in focus. I could print this one.


A spark plug from the Volvo 740. I didn't pull the plugs when I got the car because I was afraid they were rusted in and wouldn't come out without a big fight. I'm not sure if the previous owner felt the same way or didn't know to worry. The plugs looked mostly fine, except they had been arced way out of gap. Replacing them didn't fix the stumbling idle. Replacing the distributor and cleaning the cap did.


I've taken too many fall pictures. Fall is gorgeous, but my photography canon is chock full of autumn photos. I delete most of the now. But I kept this one. The leaf colors are unique. Somehow the front leaf is still while the one behind it is moving, giving the background a texture. It looks like, -feels- like, a cold autumn day.


Thursday, November 15, 2012

Brick Trick

The Volvo 740 continues to suffer from a bad case of The Miracles. I had been putting off getting emissions inspection for a while. First, because the distributor seal had blown, causing it to spew oil and smoke, and second because the smell of the gases leaving the vehicle, even without an oil leak, is so horrid that I thought the emissions were off the charts.

Of course, it failed the first pass inspection: why? Exhaust leaks. I had left the exhaust clamps a bit loose when I installed the new mufflers so I could save them when the catalytic converter failed (it's mostly rust). I spent an hour replacing each rusty clamp with a new one. The heat seems to break down the antisieze compound, so the old ones were removed by snapping the rusted nuts off with a socket.

With the shiney new clamps installed, and a new exhaust hanger fabricated out of a random bolt and spring from the junk drawer, I took the car back. "Certainly, now, I will pay 28$ to discover my catalytic converter is foozy and the oxygen sensor isn't!" I thought.

But I was wrong. The mechanic called a few hours later to say the car passed. With better marks than last time.

It's not like I'm trying to make this stuff happen.


Wednesday, September 12, 2012

Are Volvos Dorky?

I'm so glad you asked.

I know you asked because you typed it into google, and it showed up on one of todays search terms that led to my blog. (For a long time "Dating a Chemist" was a popular term, but now I'm married, so I imagine "Marrying a Chemist" should be the correct search term, for those of you who know who you are.)

The short answer to your question is "maybe".

To people who own Volvos because they are safe, refined, sensible cars, they are not dorky. For late model Volvos, these people tend to be high income families. Volvos aren't dorky if they are owned by these people. They're the sensible European alternative to a market that is otherwise dominated by nazi sleds.

There is another group of people, almost completely isolated in the pacific northwest and new england, who drive old volvos because they are safe, repairable, and have somehow survived 25-35 years wihout rusting (much). These people are almost certainly driving Volvos with model numbers that end in a "-40". These people tend to be credit card hippies who inherited the family station wagon from the first group, or high income wanna-be hippies (like college professors) who bought one to celebrate getting tenure and never thought about it again. Either group has the financial wherewithal to take their car to Sven the Volvo Stooge for the twice annual 1000$ repair job without pause, and even walk away from such experiences feeling righteously smug, having certainly done some good for the world by keeping their car running. Hippies and professors tend to be dorks. QED.

The last group of people who own Volvos have a strange obsession with driving a boxcar. More than that, they probably want to drive a box car like a sports car. They spend a lot of time ordering obscure parts from europe and obsessing about how gases flow through their "flame trap". They might have any of a sequence of Volvos, but that's hardly matters, because there is always some components from some related model that they wish they had in the car they actually own. These poor saps spend more time under their "reliable, easy to fix" rustbuckets than they do with human beings, which is sad, because real car people usually have an really awesome car to show for their effort. Thus, their obsession with a car with industrial aerodynamics, bus-like acceleration, a design cues only a soccer mom could love, makes them hipsters who believe that they have something cool that was never actually cool, and therefore dorks.

So, there you have it. If you make six figures, don't want seem stuck up, likely have two kids (you should check just in case), and are the first owner of a late model Volvo, you're free and clear and not a dork, just reserved and refined.

Otherwise, if you own a Volvo, you're probably a dork.


Mystery

I finally replaced the brake master cylinder in the Volvo. I have a 740 that does not have ABS, but in ordering parts online, I found that some places don't distinguish. That's bad.

Sadly, I can't tell what was wrong with the old one. The fluid in the cylinder was full of fine metal filings (grey brake fluid instead of clear). The seals all looked fine and were not torn. By rights it should have worked. The only clue I was left with is the body of the piston has substantial wear marks. Perhaps 360,000 miles worth of stopping just caused the cylinder bore to widen enough that the seals didn't flare enough to seal against the sides.

Life is full of mysteries.

Regardless, the pedal is firm now, so I can approach traffic lights without a heightened fear of deploying the airbag.


Thursday, August 16, 2012

Braking Bad

It started with the ChevOldsmobuiac. It was the morning before I was leaving town for a long business trip. The wife and I drove to breakfast, and we noted that the exhaust resonance was a bit loud. "I'll check the mounts when I get back," I thought. She dutifully set the parking brake when we stopped, and we enjoyed a wonderful breakfast.

When we got back in the car, the noise was a bajillion times worse, and the car felt like it was dragging a dead water-buffalo. We limped drug home, and I changed clothes in the vain hope that I could enact a repair in the few hours before the flight.

Laying under the car, it was obvious that the muffler had torn free of its mount. By this I do not mean rusty metal popping free, rather that shiney clean sheet metal on a fairly new muffler had been curled back by vibrational stress. That will have to be welded before it will pass inspection again, but in the short term, I applied some coat hanger wire to buttress the mount.

Engine noise problem solved.

The lack of urgency was more curious. I jacked up the rear wheels and found that the right rear wheel wouldn't rotate foward: a sign that the parking brake was stuck on. I pulled the wheel and beat the brake drum off with my deadblow hammer. After some fiddling, I determined that the brake cable had seized, quite likely due to the hot exhaust pipe laying across it. In the hopes that my fiddling got some slack back, I pushed the drum back on, and drove the car around the block. Yes, I got some slack out of the cable, but not enough to let the wheel coast free. The car was dead in the water until I got back.

Fortunately, there was the other old standby: the Volvo.

Which worked great, until either last night, or today, when the brake pedal started to go limp. No one remembers when exactly it started, but it was fine all week. Today, it felt a little mushy on the way to work. When I got to the parking lot, I checked for fluid leaks, but found no puddles or seeps. On the way home, it was even worse, the pedal required pumping and nearly bottomed out. I drove ultra conservatively and massively downshifted to bleed speed.

So, now we have one car that is essentially an immobile hulk and another that is an uncontrollable high speed death trap.

That leaves the motorcycle and a bicycle, and there's a 70% chance of thunderstorms tomorrow.

Tuesday, April 24, 2012

Bicycles are cheap

Thus, warm weather saves money. I don't remember the last time I got gas. I think the reason is the last time I stopped at the gas station was in February, at least judging by the receipts in the car.


Wednesday, April 18, 2012

Volvo B230 Oil Filter Cursory Comparison

I changed the oil in the Volvo for the first time in 19 months. To be clear, after 19 months and 3000 miles. In the future I will just use synthetic oil, not necessarily the expensive Mobil1.

I also took a moment to compare oil filters, since the replacement I had on hand was a Mann, and the filter I was pulling out was a Fram.

Everybody hates on Fram oil filters. It's a wrench junky past time. Search for your personal brand of car, and Fram is likely to be at or near the bottom of the list of oil filters that anybody lists. This finding raises my doubts about using Fram filters, but in many stores, they are the dominant or only filter available, especially for my aging pile of rust buckets.

Worse, and more confusing, there is little verifiable oil filter performance data available. What size particles are removed? How many particles can the filter carry before it clogs? Does it have (or need?) a bipass filter? Does it create excessive back pressure for the oil pump?  A table of SAE J1858 results for each oil filter on the market would be very useful.

The volvo dorks all say Mann or nothing. There are even claims that the Fram filters don't fit the B230F volvo engine without hitting the frame (patently untrue!).

Without any real solid facts to go on, I use oil filters that I can easily make handy in time to change oil. Last time I did the volvo's oil, I ordered a bunch of parts from rock-auto, and the filter came out as Fram. This last time, I capped an order from IPD with a Mann.

It is obvious that they are not the same filter. They both have a bypass valve in the back, though the assembly is different. The Mann has 4 large vent holes around the threaded center hole, while the Fram has 8 smaller holes.  The Frams threaded plate puckers in a little. The Mann puckers out. The Fram has a nice grippy rubber coating, while the enamel on the Mann makes getting it truly hand tight a bit of a challenge.


Thursday, March 15, 2012

Volvo B230 Flame Trap: Good Photos and a Good Story

One of the long standing mysteries of the Volvo has been the periodic appearance of the phenomenon that I have referred to (under my breath, of course) as the dipstick woody. That is, when I pop the hood and find the Volvo's dipstick 3-6 inches removed from the sleeve.

Reading the Volvo Apocrypha, the useless Haynes manual, and a few other references. I was left with the impression that the positive crank case ventilation system (PCV) might be clogged, and that I should inspect the flame trap and oil phase separator for blockages.

Finding the flame trap is left as an exercise to the mechanic apparently. After some head scratching and re-reading the references a few times, I was able to locate the separator box under the intake manifold, and from there, the flametrap itself. For those who know where this thing is, it's bleeding obvious. For those who don't, you stand there staring at a mess of vacuum, water, and gas hoses, and wish that god had sent you a BMW, since at least it would be fun to drive.

So, for your reading enjoyment, I have carefully documented my volvo b230 flame trap adventures.

A wee test: can you see the PCV hoses (flame trap) in this photo?


Were you right? Here. I'll take the intake hose off for you to see it.


I'll even zoom in a bit.


To remove it, I recommend first removing the small vacuum hose to the intake manifold, then trying to lift either the upper pcv hose off the fitting, or pulling the whole unit off the hose that goes to the separator box. The hoses are not tightly attached. To put it back in, I reccomend putting it in the lower hose first, the pcv hose second, the the vacuum hose last. Be sure it is rotated correctly for the vacuum hose to reach when you first install it.


Of course, after finding this treasure, i did the next most brilliant thing I could think of: I broke it trying to pull it out of the engine.

Wups.

You'd think they'd make them out of cast aluminum or something, but I suppose they had to try to cut costs somewhere.

I tried to use epoxy to glue it back together. The result looked nice, but didn't actually work. I repeated this process a few times.
I ultimately gave up, plugged the vacuum inlet with duct tape, and ordered a few more flame traps from IPD.

The old one had quite a bit of gunk it it, but it was not clogged.

Comparison of the original trap and a new one.

The hose to the separator box was cracked and leaking. I procured a replacement.


Gunk obstructs the vacuum outlet.

More gunk in the hose. Lovely.


This didn't cure the dipstick woody issue. However, I did notice something else that I believe was the cause. With the aide of a zip tie, I have corrected the problem.