
Some bygone aphorism stated that every journey starts with a step. In the case of half shaft replacement on a 24 year old car, that step requires a 36" long wrench and a 24" cheater bar. The axle nut was originally put on with Loctite and 190 ft-lbs. Then it had all of time and every weaving frost-heaved winter road in New Hampshire to rust over.

Marco Polo, eat your heart out.
The main inspiration for replacing the seals and and halfshafts is that they were all leaking. The shafts had been leaking for years, and though they still seemed good and tight, were in the way of replacing the seals that were leaking transmission fluid more quickly than I was comfortable with. I replaced the bearings too, since they are easiest to remove while the shafts are out, and the were getting a little chatting in hard curves.


The wheel bearings are simple to remove on the Cutlass Ciera: They're held in by 3 star-drive bolts to the steering knuckle. No hydraulic press needed. The half-shafts came out of the bearings really easy. A half-hearted rap with the deadblow mallet broke them free.

Leaky tie rod ends: a project for another day.

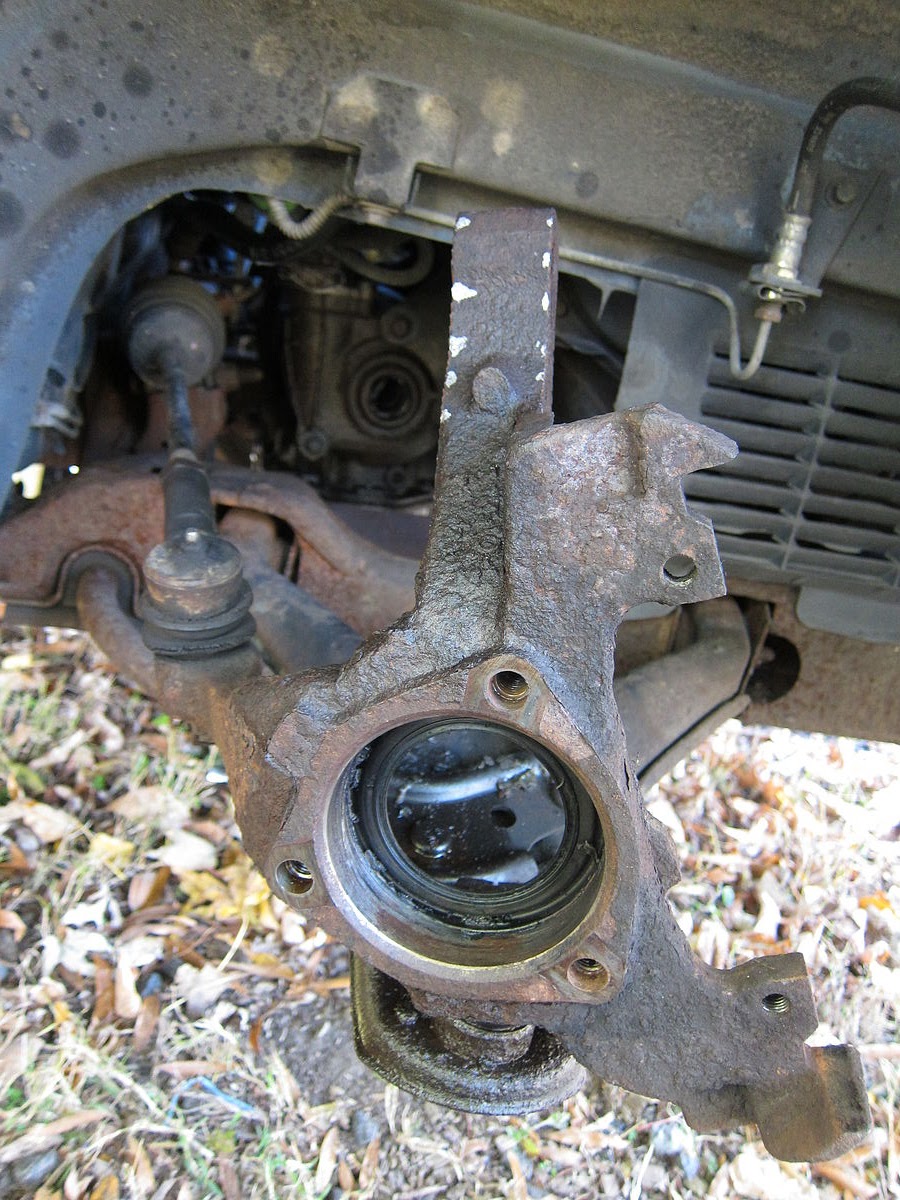
The knuckle needs to be separated from the strut in order to pull the halfshaft out. I painted guidelines on the assembly so I could reinstall without throwing the alignment. The bolts holding the strut to the knuckle were fairly corroded, and a huge amount of work was required to break them free and unthread them.

The halfshaft is held onto a splined haft inside the transmission by a spring circlip. It takes a bit of force to pop it of. I ended up jacking the car up another few inches so I could put the breaker bar between the frame and the shaft housing, then hit it hard with the deadblow hammer. The housing looks like plastic, but is really cast aluminium, and it suffered no ill effect from the whack.

The exposed shaft in the transmission.

Getting the axle seal out of the transmission was not an easy job. Haynes called for a hammer and a cold chisel, but there is not enough room to get a good angle on the seal, or a good swing with the hammer, so the process of deforming the old seal required patience, several flatblade screwdrivers, and a needle nose vice grip. To get the seal out, I pulled little bits off until I could get between the seal and the transmission to really deform the seal casing. It took over an hour to finally dig it out.

Transmission without any seals. Drivers side, I believe.

Getting the new seal in was as hard as getting the old seal out. Finding a round object suitable to evenly push the seal in was not easy. I tried for another hour or two to use various scraps of PVC and the socket for the halfshaft nut, but the seal refused to go in flush. I eventually went to the hardware store and purchased a 2 foot piece of pipe that fit over the seal exactly. I also removed the strut to give myself a straight shot at the seal.
In the end, 10$ at the hardware store did in 10 minutes what I had spent several hours failing to accomplish.
Say hello to my little friend.

New seal, installed.

New and old halfshafts, compared. The new shaft slide right in and clicked into place without a lot of force.

Wheel bearing removed from knuckle. There is a dust seal on the back of the knuckle that matche a seal on the halfshaft. However, there is also a seal on the bearing itself. I still stuffed this with grease to keep anything from rusting together.

New wheel bearing.

Passenger side leaks, for posterity.

The passenger side halfshaft has a splined in the plugs into the transmission. I suppose it's impossible to put it together backwards, even if the different shaft lengths didn't give it away.

I pulled the bearing off the passenger side before removing the halfshaft to give myself more room to work. It only helps a bit, still a tight squeeze.
Installing the new shaft revealed that it came with a ABS sense ring. This oldsmobile doesn't have ABS, and, strangely, had a large iron ridge in the steering knuckle that almost seemed to exist to keep the ABS shaft from being installed correctly. The method of attachement for the abs ring wasn't readily apparent (glue? pressed? spotweld?) so I opted to grind of the ridge on the knuckle rather than try to remove the ring on the halfshaft.

After grinding, I had to clean up all the shavings to keep them from getting into the assembly. In retrospect, it took so much time to grind the knuckle that putting a notch in the ABS ring to see if it would easily come off would take a lot less time.

General notes:
-Every fastener seemed to be rusted together. This job could probably be done in less than 8 hours if nuts and bolts would spin freely.
-Paint guidelines on the interface between the struts and the knuckles to preserve the alignment.
-Remove the struts. It's just 3 nuts and it makes a lot more space in the wheel well.
-Jack up both sides of the car so it's easy to push/pull the rack without having to twist the steering wheel. Getting the end of the halfshaft out of the wheelbearing required a lot of experimentation to get the knuckle into just the right spot.
-Come prepared with lots of grease and threadloosening fluid
-Be patient and have lots of pointy tools for removing the axle seals in the transmission.
No comments:
Post a Comment
Leave a message after the tone...